


Morian
-
Posts
2,813 -
Credits
0 -
Joined
-
Last visited
-
Feedback
0%
Content Type
Articles
Profiles
Forums
Store
Posts posted by Morian
-
-
Holly Shit Is Perfect!
Thank you a lot maniakmike! now I go to make my own!
-
Or you could just use Magic Wand Tool with some extra options ;)
Nice one,
-Blane
Yeah! But I preffer the Polygonal Tool, I don't know why, Maybe cause is my first tool that I use to cut images :P
-
To ///fly kai ///hero douleboun mono se gracia, Mou eixan peiasei se pollous servers...
Anyway thank you for share, Einai polli kalo! Keep up my friend!
-
Nice share man! thank you! It's very good!
-
hehehe Nice program!
I send it to my friends :P
Thank you!
-
-
Yeah Blane is F@CK!NG pro!
BTW I Created one more logo, And IamAlone thank you! :P

-
Thank you TheEnd nice Guide!
Very Helful for one Newbie (Kenji) :P
-
And from me!
This is my noobish Logo!
-
what can i say... this guide is a simple c/p....
and also for most of these heroes here guides have been made. Those guides explain much better those skills ;) you should take a look at them :D
//agree with Kenji we have made most expain guides from this... :P And yours is a simple C/P
Anyway Thank you.
-
CS3 cause I don't have see the CS4...
So My vote goes to CS3
-
XAXAXA The images Fly!
Thank you man is awesome!
-
he he I know Ctrl + Spin, But Shift + Spin didn't know them. :P
Thank you K4rma.
-
on my windows xp when i try to save with this extension *.vbs dont save me can youtell me what seems to be the problem?
If you go to save as *.vbs don't can save them... You must write one name in the position of *
Write Speak.vbs and you can save them ok!
-
What the fuck is this?
Gia pes mas peritinos prokite, Dhladh ti story exei ayto to paixnidi? :O
By the Way add [GR] in your title of topic.
-
XAXA good! Thank you.
-
Ta pio polla einai gnosta, basika ola :P! Anyway thanks you.
-
OMG!
This is the best share from you! I think!
Kame Ha Me Haaaa!!! :D
K4rma I Cry For happy :D
Thank you a lot! You are the best!
-
Just I love the new section!
Agree with ZeRo* One more new challenge!
Thank you 1000 times! :P
-
Symfonw apolita paidia! Eimai Kati ths Pagosmiopoihshs...
Ti ousia exei to nohma ths zwhs an den exeis kati diaforetiko apo ton allon?
An eistai oloi idioi Ti sousia exei ayto to pragma?
Oust re pagomoiopoihsh sucks...
-
Very good guide thanks!
Keep up the good work my friend!
-
LOL! Very Good!
Now I go to make my city "Ioannina" to ghost city! With Titlle "The soul of Alli Passa come back" :P
-
Ever wanted to learn how to use Adobe Photoshop, but had no idea where to start?
Most Adobe Photoshop tutorials are for people who are already familiar with Adobe Photoshop. This tutorial goes right back to the DAWN OF TIME! :) ...and is designed for the Adobe Photoshop beginner.
This basic, thirty-minute tutorial is not a comprehensive instruction manual. It only gives you the very basic features you need to know to start using Adobe Photoshop. From there, you'll quickly discover most of the other features of the program.
The images in this tutorial are from Adobe Photoshop 7.0, but they're very similar to those from other versions of Photoshop.
1 – Creating a New Image, and Setting Adobe Photoshop's Undo Option
Click File > New, and create a new image of any size you desire.
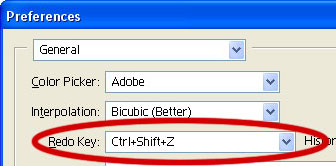
Press Ctrl+K to bring up the Preferences window. (In Adobe Photoshop 5.0, you'll need to click on the Settings tab, on the File menu.)
Change your "Redo Key" to Ctrl+Shift+Z. This enables you to press Ctrl+Z while working to undo your last actions. Remember this.
2 – Using Adobe Photoshop's Layers window
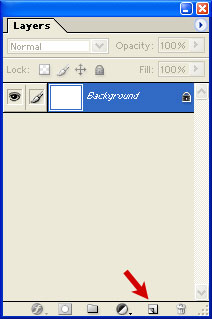
The Layers window shows the various layers that your image is made up of.
To make a new layer, click the New Layer button, as shown by the red arrow.To work on a different layer, click on that layer. The eyeball will apear next to that layer.
You can drag layers up and down the list.
Remember – create a new layer for each part of your image. This allows you to go back and edit the layers individually. Every Adobe Photoshop novice at some time makes a masterpiece, only to find out that they did it all on one layer, and now they can't remove those pink clouds they put on it. :)
3 – Learning about Selection
One of the most important concepts in Adobe Photoshop is Selection.
This is the Rectangular Selection Tool.Use this tool on your image to select an area of the image. This lets Photoshop know that that's the area you want to work on.
4 – Adding to a Selection and making a square
To add to a selection, hold Shift before dragging.
To make the selection exactly square, start dragging, then hold Shift.
You can press Ctrl+D to "deselect" and remove the selection at any time.
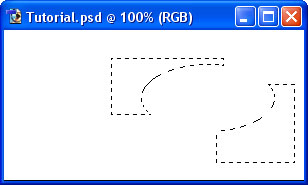
5 – Elliptical Selections and subtracting Selections
Hold down on the Selection Tool on the Toolbar, and choose the Ellipse.To move the selection, just click inside it and drag.
Holding Alt while selecting subtracts that area from the selection. I've done that with the Ellipse Selection Tool.
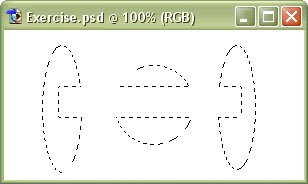
6 – A Selection exercise
If you're following this tutorial in Adobe Photoshop, see if you can make these shapes.
Other relevant Adobe Photoshop tools
Lasso Tool – Allows you to draw a selection area with the cursor.Magic Wand – Summons elves. (Also believed to select an area of one colour.) :P7 – Choosing a colour
Now that you know how to select an area in Adobe Photoshop, we can look at some tools that can do something with that area.
Before we get started on colouring your selection, you'll need to pick a colour.
This part of the Toolbox is where you select your colours.
The top square is the foreground colour. If you use a brush or paint bucket, it will apply this colour.
The bottom square is the background colour. It has various purposes, but it's also a good place to store a second colour that you're using.
Click on either square to change its colour.
Click the arrow to swap the two colours.
Click the little squares to reset the colours to black and white.
8 – The Paint Bucket and Gradient tools
These two tools are on separate buttons in Adobe Photoshop 5.0, but share a button in Adobe Photoshop 6.0 and Adobe Photoshop 7.0. To select one, click and hold.
On a new layer, just click the Paint Bucket tool inside the area of your selection to fill it with the colour you've selected.Click and drag from one area to another to fill the area. The point where you started to click will be the colour of your foreground colour, and the point where you took your finger off the mouse button will be the colour of your background colour. The area in between will gradually change from one colour to the other.In this case, I went from corner to corner, with the default white and black selected.
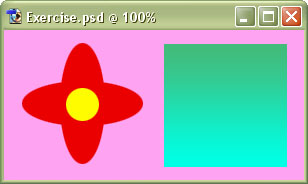
9 – A colour exercise
With what you've learned so far, you should be able to recreate this piece of hippy history. :)
Remember to create each step on a new layer.
Other Adobe Photoshop tools of interest include
The Text Tool – Just click it wherever you want text to appear. Choose a font, colour, and size, and start typing.The Move Tool – Use this tool to drag things around. If you have a selection, it will drag the contents of the selection. If not, it will drag the contents of the layer you're on. 10 – Adding Effects
Now that you know the basics, it's time to start adding some easy special effects.
To demonstrate Adobe Photoshop's special effects, here's an unembellished button for a website.
Each part of this image is on a separate layer.
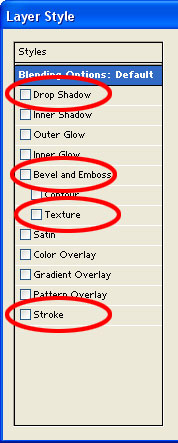
11 – Key Adobe Photoshop Blending Options
In the Layers list, right-click on a layer, and select Blending Options (Adobe Photoshop 6.0 & Adobe Photoshop 7.0) or Effects (Adobe Photoshop 5.0.)This is a picture of the left-hand portion of the Blending Options window that will appear. (The window is much smaller in Photoshop 5.0.)
Drop Shadow
Selecting this option will make your layer cast a shadow on layers below it.
Bevel and Emboss
Makes the layer like a block of gold bullion - raised in the centre, with edges that slope down. (This is a good effect for creating buttons.)
Texture
Makes the surface of the layer look like it's made of wood, stone etc. Use the "Overlay" setting.
Stroke
Stroke is just another word for "outline". A Stroke is useful to make an object stand out from its background. (In Adobe Photoshop 5.0, this option doesn't exist. Use Outer Glow as an alternative.)
12 – The end result
Other than using some of the Blending Options, nothing else has been done to this button.
It's really that easy.
A final few Adobe Photoshop features
Zoom: Press (Ctrl and +) to zoom in. Press (Ctrl and -) to zoom out. This is very useful if you're a bit of a pixel pirate :)
Transformation: To Transform (resize/rotate/distort) an object, press Ctrl+T. To Transform a selection, click Select > Transform Selection. Use the Shift key while transforming to stop the image distorting.
"Special Message"
I hope this tutorial has helped you get the idea of Adobe Photoshop. You can now face the "wall of random icons and palettes" with confidence. :)
Happy Photoshopping!
Source http://www.pegaweb.com
-
hehe Very Nice K4rma!
Soon I make one image with me, To make me a super saiyan! :D
Thank you!


 To make a new layer, click the New Layer button, as shown by the red arrow.
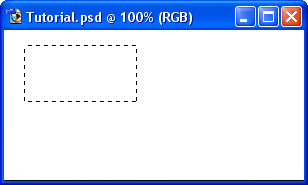
 T
T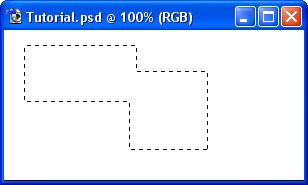

 Lasso Tool –
  Magic Wand –


 The Text Tool –
  The Move Tool –
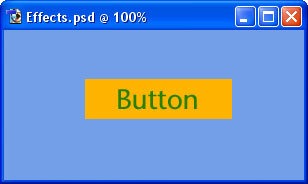
 In the Layers list, right-click on a layer, and select Blending Options (Adobe Photoshop 6.0 & Adobe Photoshop 7.0) or Effects (Adobe Photoshop 5.0.)
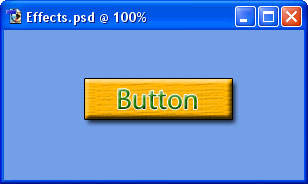
[Tutorial]How to make a render!
in Tutorials/Guides
Posted
Topic Update!
@Titlle Changed!