-
Posts
2,813 -
Credits
0 -
Joined
-
Last visited
-
Feedback
0%
Content Type
Articles
Profiles
Forums
Store
Posts posted by Morian
-
-
who cares for a section where nopost for 2 years
Me... :P
Noone but is really fail.
-
-
It's not empty at all....
Well, the depth is great also you lighted good the focal point. I can't find it hq too. A text with a special font will be good idea, i guess.
The outcome isn's the best but is good enought. :)
-
You should update the topic with images so ppl will see what they are downloading..
Don't undig old topics man. It's not allowed. First warning for you, take care.
-
Amazing idea and work also!
-
Simple and nice
I like the difference between the aura!
-
Happy Birthday!
-
[GR]
Mono kai mono gia afto poy egrapses tha sou pw ti pragmatika pisteyw.
Asxoleisai me photoshop kati mines, den exeis mathei to paramikro pragma apo to na vazeis ena BG, to render kai ena text me Windows Font.
Den exeis idea ti einai to flow, to lighting, to smoothness, to atmosphere, to blending kai den prokeite na matheis pote sou na xeirizese to photoshop
mono kai mono epeidh exeis mathei 2 pragmata apo ena tutorial kai exeis meinei ekei pera.
Oso gia to signature:
To xeri tou einai kommeno = QQ
No smudge = no blending
No flow = not attractive
5 brushes spots poy exeis kanei ta exeis kanei ksebarka kai den teriazei kanena apo afta me to BG
To BG einai ena aplo wallpaper poy vrikes sto internet kai to evales.
Parolo poy ta borders den einai tu gustu mou, edw pera einai kai xeirotera apo oti tha perimenw.
Wriste loipon ena to CnC sou.
Kalo vrady.
I couldn't agree more...
-
LOL the "scrats" effects is so reallystic...A-W-E-S-O-M-E
-
loled. haha :P
-
den mporw na to dw =/
Because your post count is low, you need at least 20 post to see it.
And don't speak greek on english section, isn't allowed. Take care.
-
Name: +af.MasterDisaster to gold member.
Reason: I think he is ready, he done very good job on the forum, and always he try for better things imho.
-
-
yep im just saying pretty much time for nothing.
If you want to practice your skill to pen tool, is the best way to do it... xD
-
Εδώ είσαι.
-
to much time u can do that in 10 mins with a pen tablet and illustrator.
Yeah... but the guide is how to make it with photoshop and not illustrator.
-

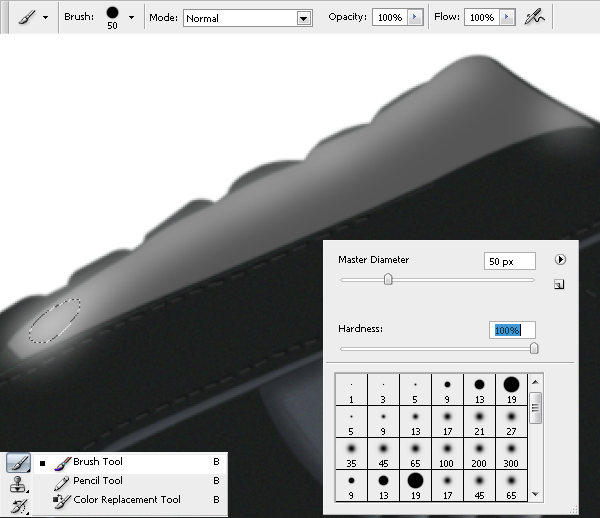
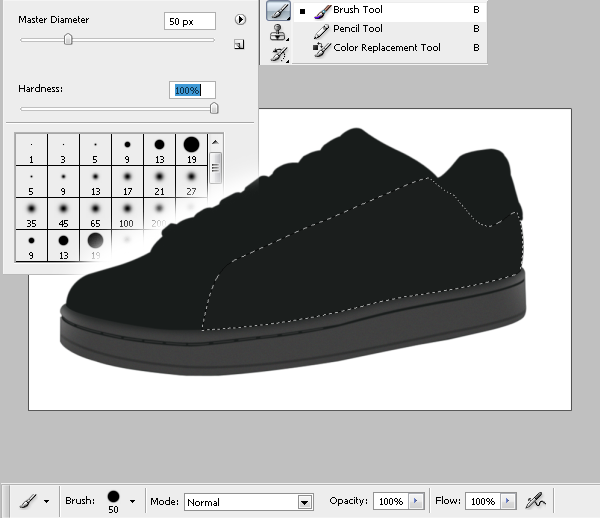
In a new layer, add some highlights in the selection with the Brush Tool (B).

Step 31
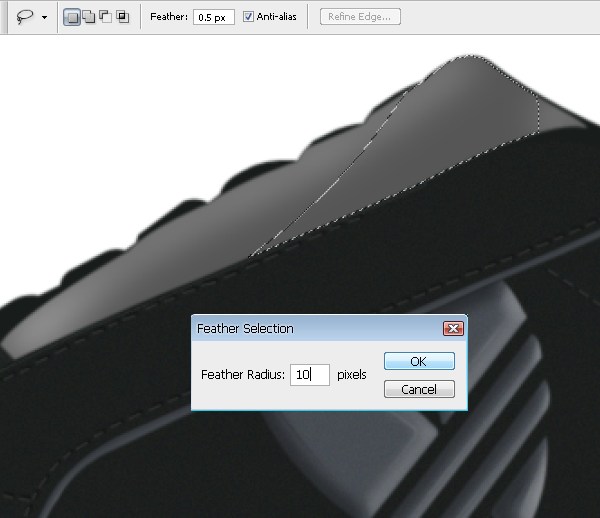
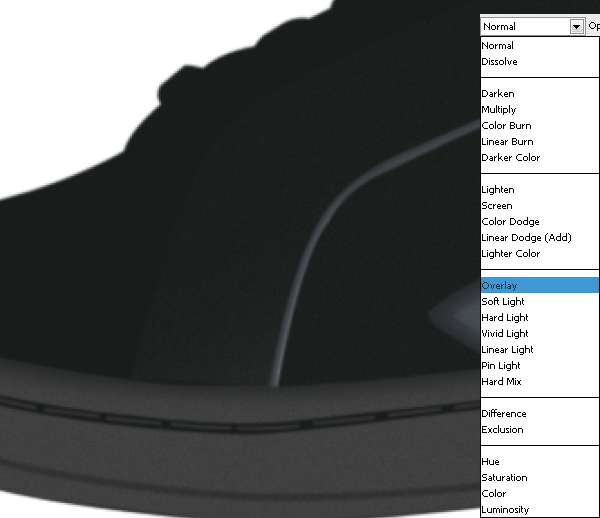
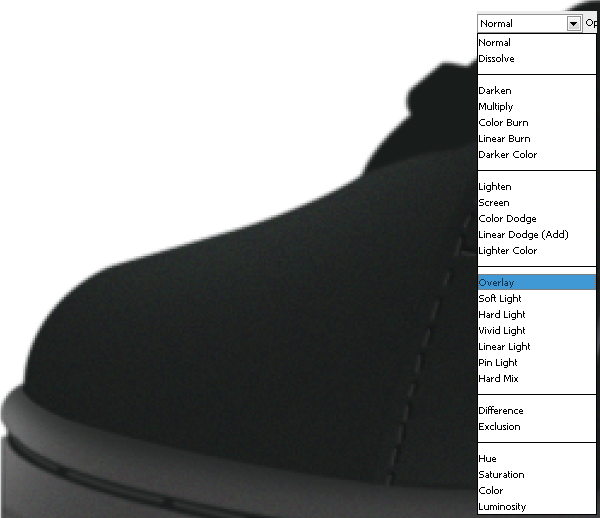
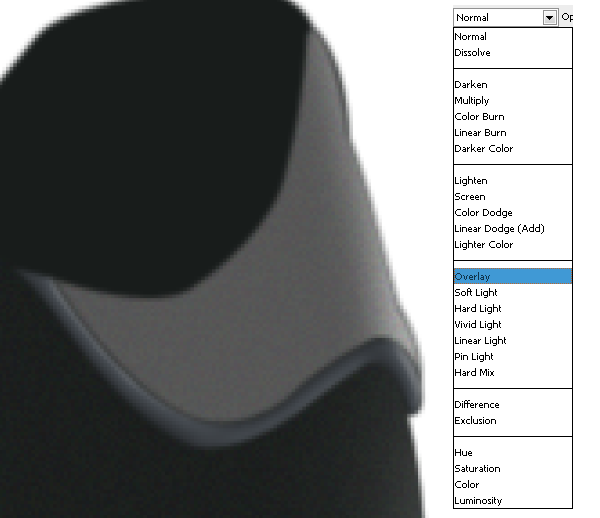
Set the blending mode of the current layer to Overlay. Make another selection with the Lasso Tool (L). Feather the selection (Select > Modify > Feather) by 10px.

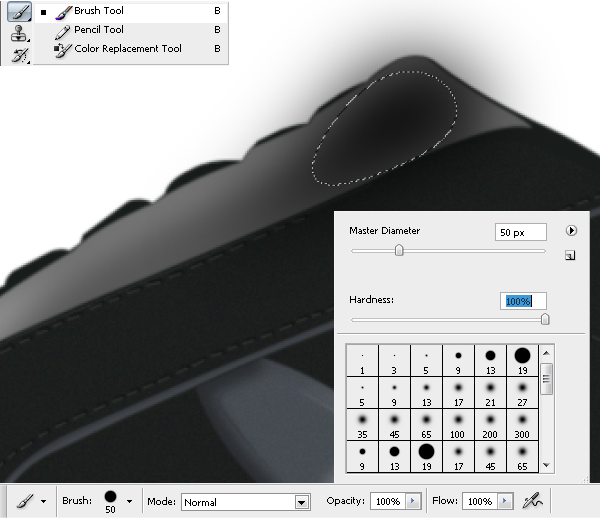
Use the Brush Tool (B) to add some black.

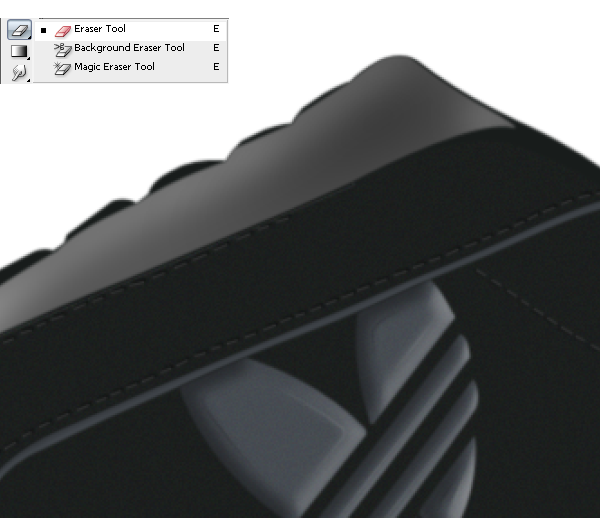
Erase the excess with the Eraser Tool (E).

Step 32
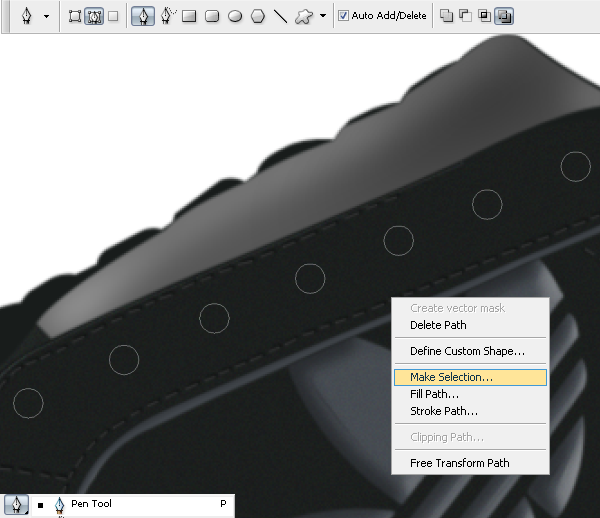
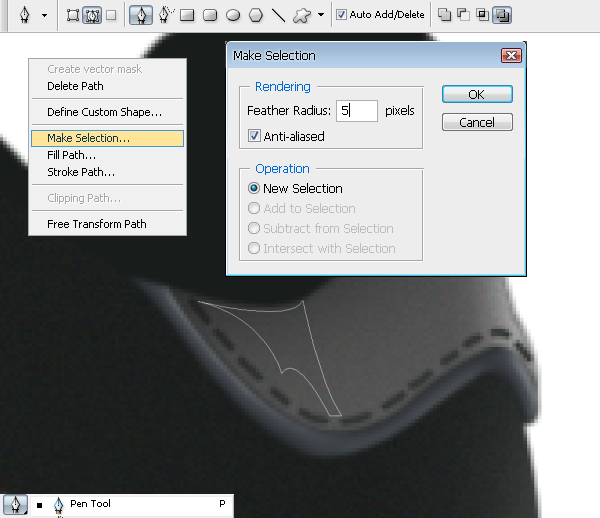
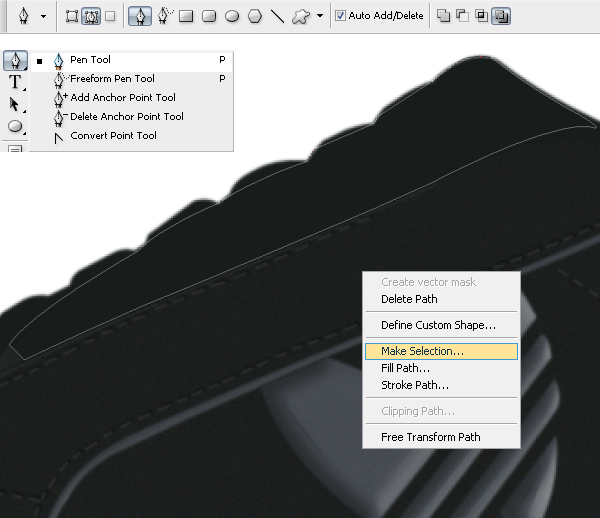
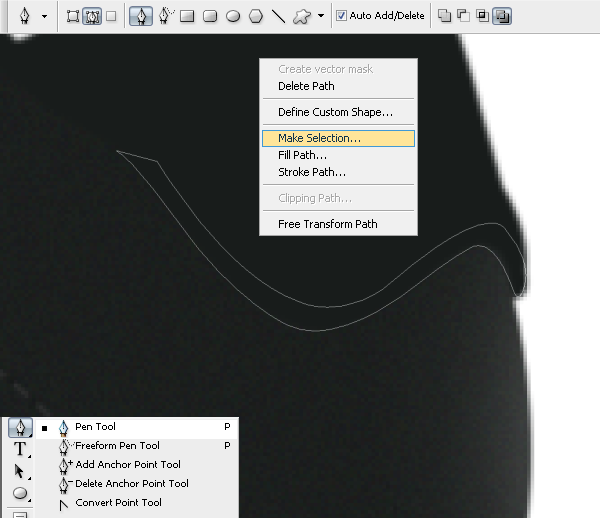
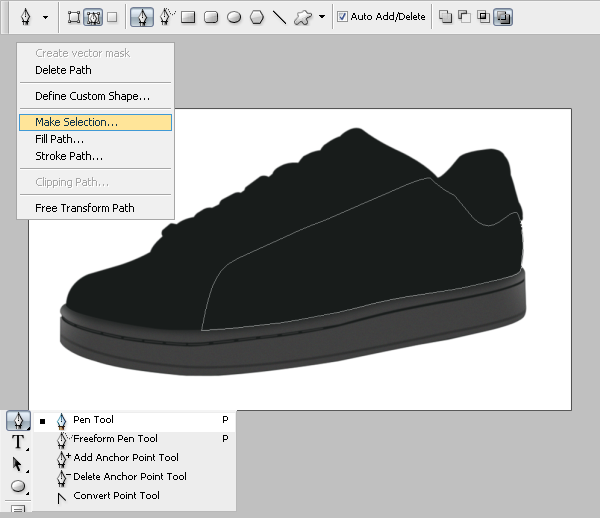
Make paths with the Pen Tool (P). Right click on the path then choose Make Selection.

In a new layer, fill the selections with color #0c0c0c.

Step 33
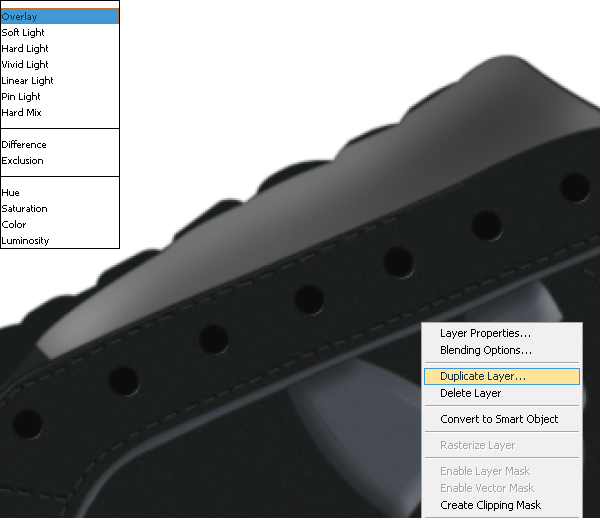
Create a new layer (Ctrl+Shift+N) then add some white strokes.

Set the blending mode for the strokes layer to “Overlay”. Duplicate the layer.

Step 34
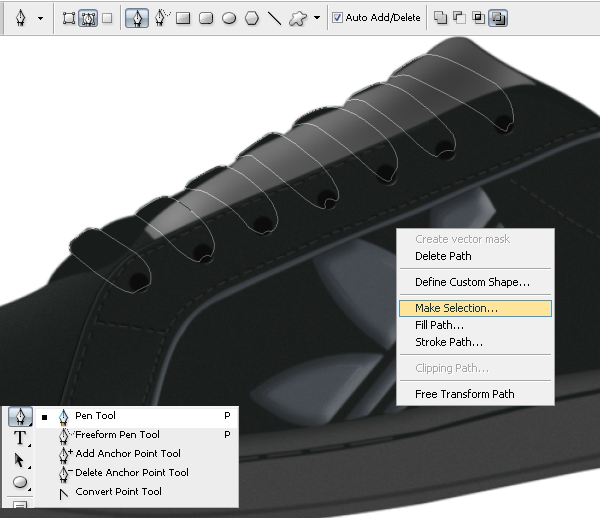
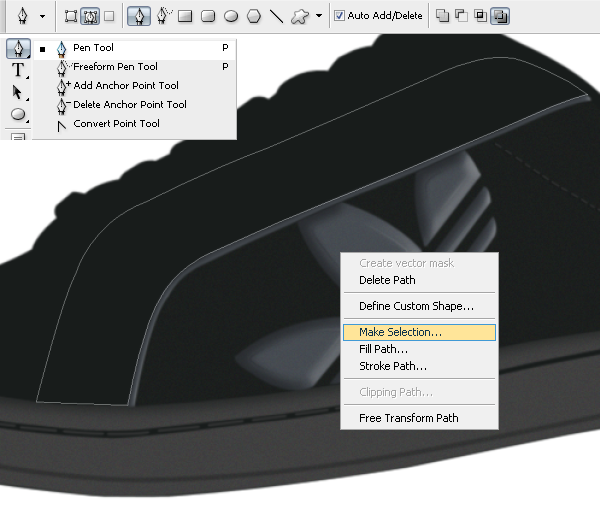
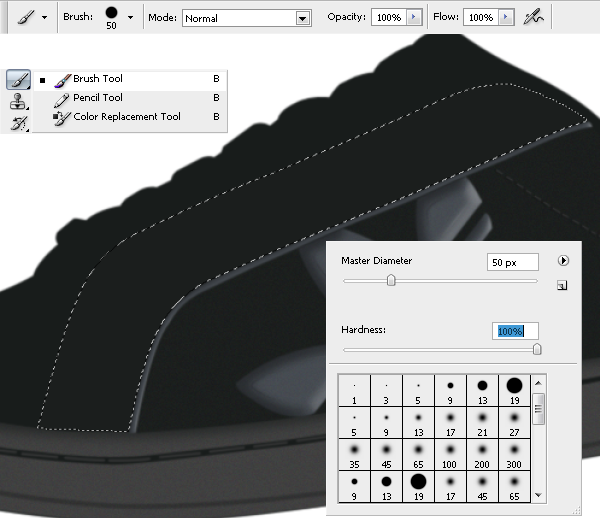
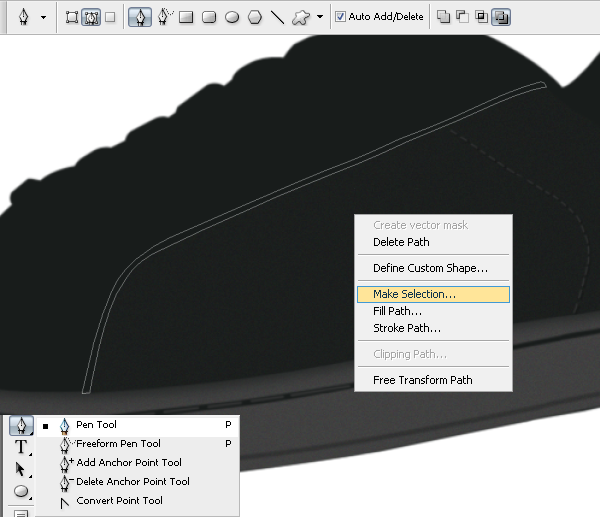
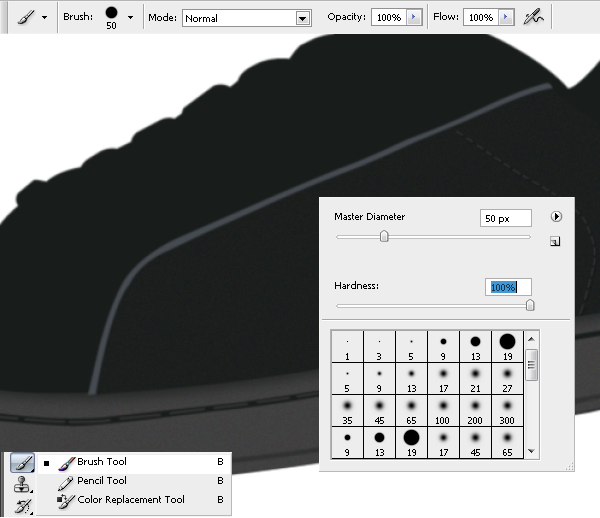
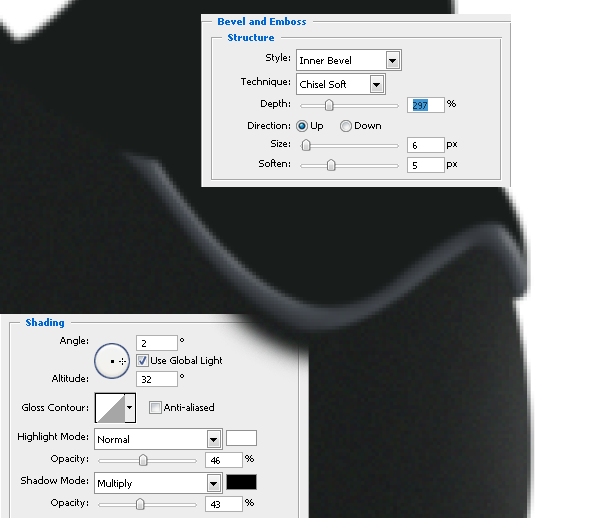
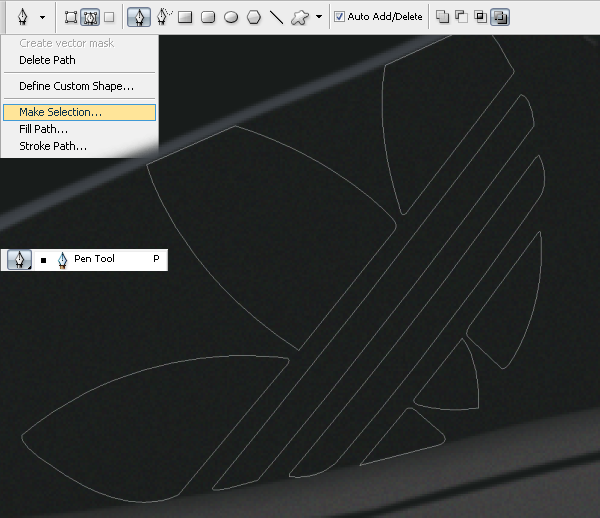
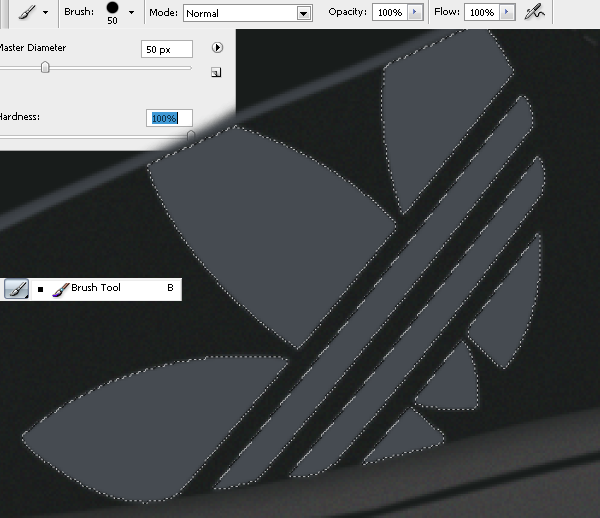
Create a new layer then use the Pen Tool (P) to make the paths shown in the image below. Right click on the path then choose Make Selection.

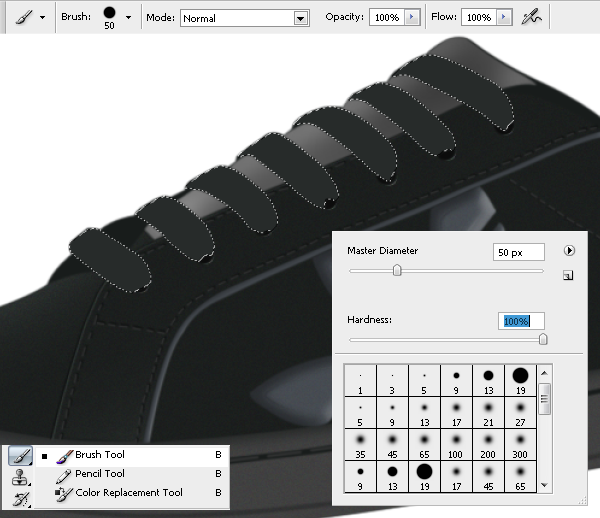
Fill the selection with a gray color, I used #272b2a.

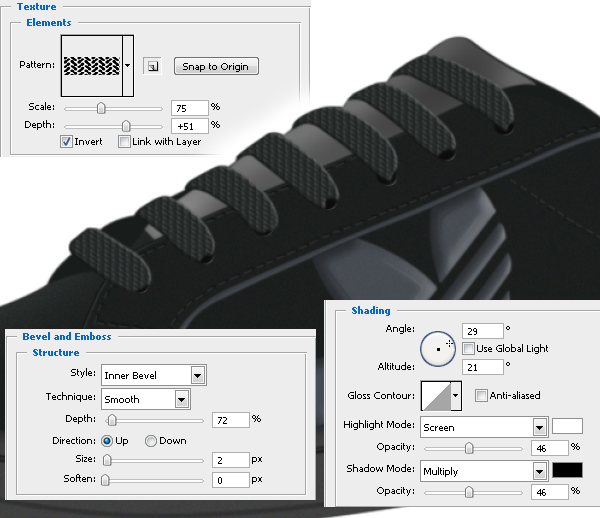
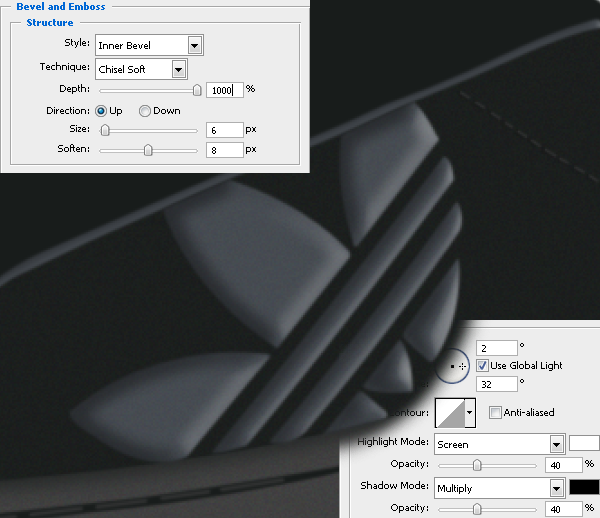
Choose Layer > Layer Style > Bevel & Emboss > add the same texture as in the picture below > enter these settings.

Step 35
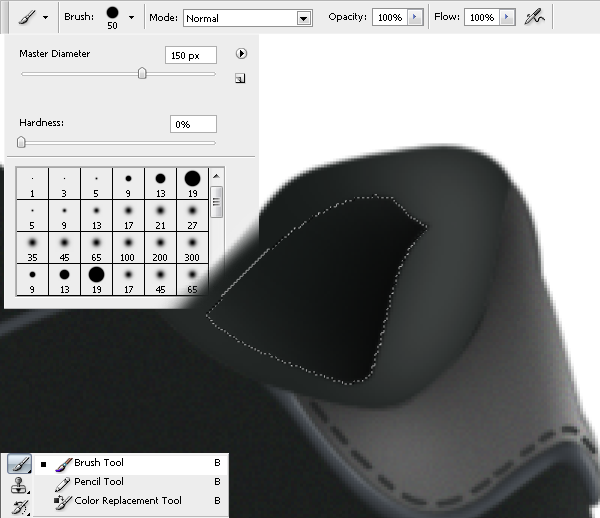
Now we’ll work on the interior. Make a selection with the Lasso Tool (L) and fill it with a dark gray color #181c1b.
Step 36
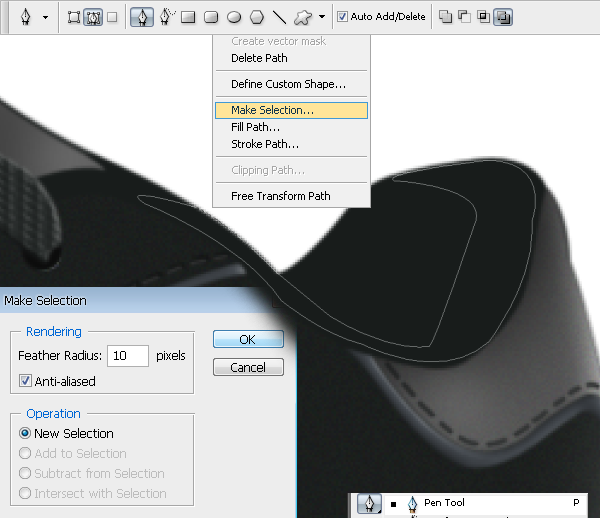
Make a new layer ,then make a path like in the picture below using Pen Tool (P). Right click on the path then choose Make Selection.

Fill the selection created at the step 36 a with a white color

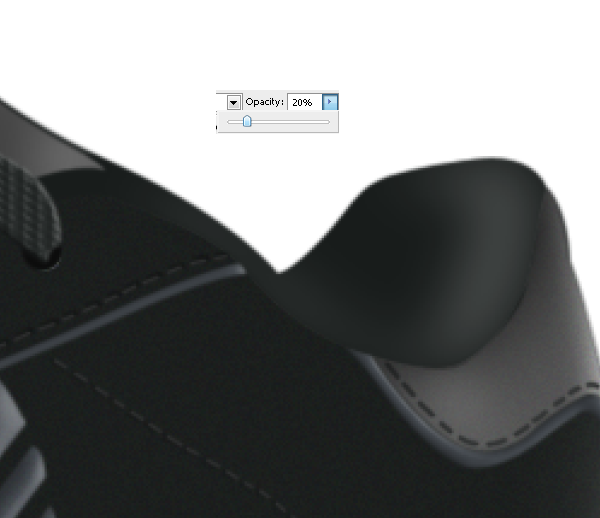
Decrease the opacity of the layer at 20%

Step 37
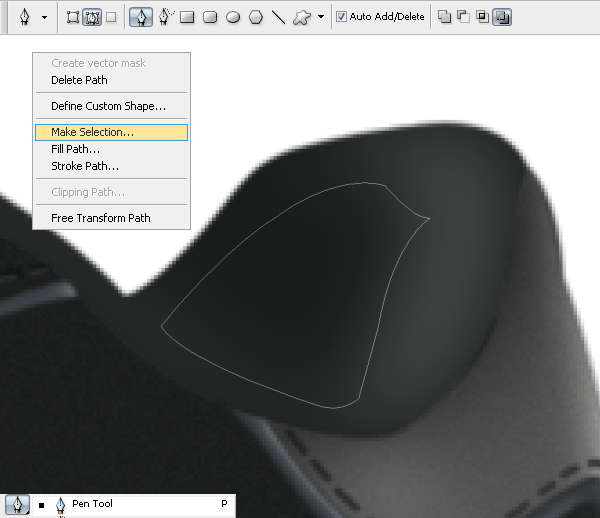
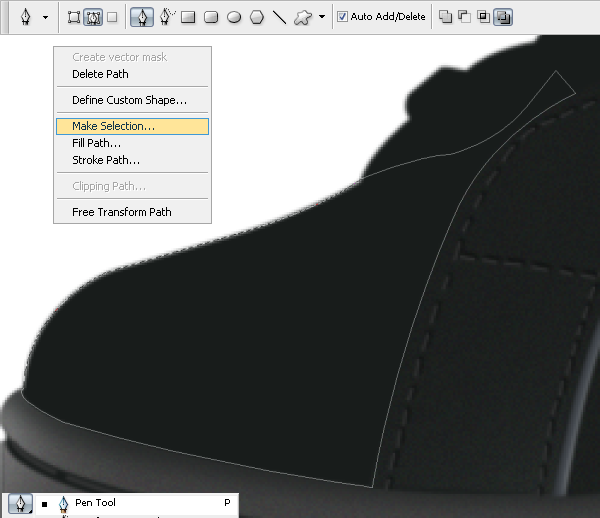
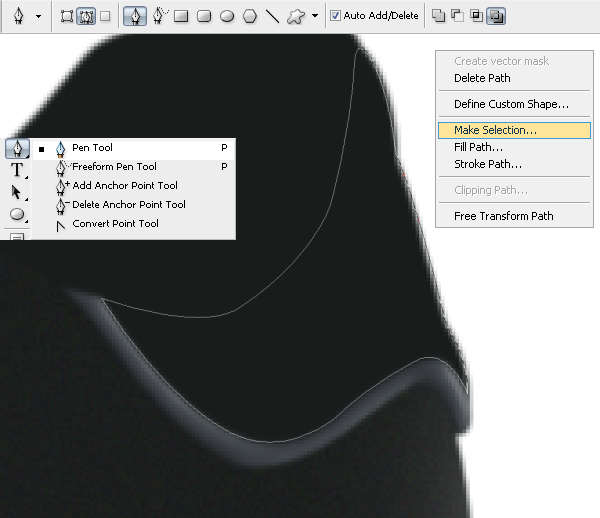
Use the Pen Tool (P) to make a path, then right click on it and make a selection.

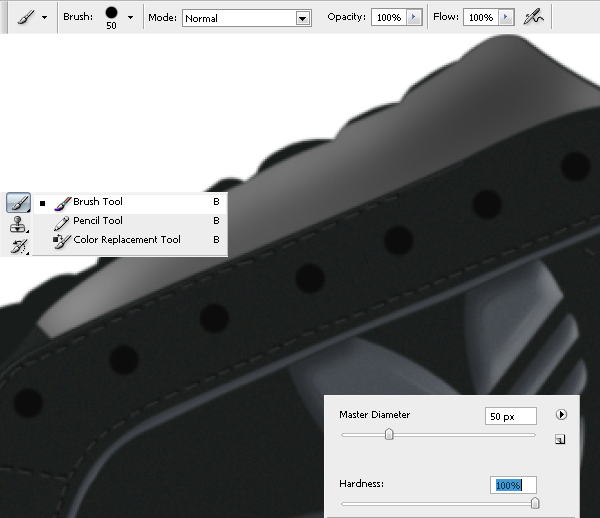
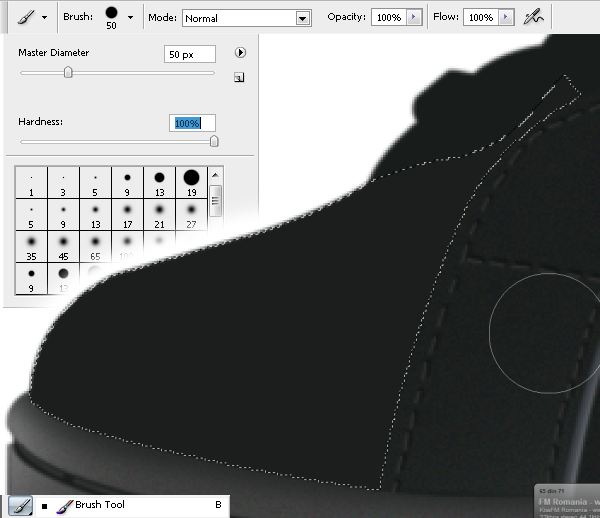
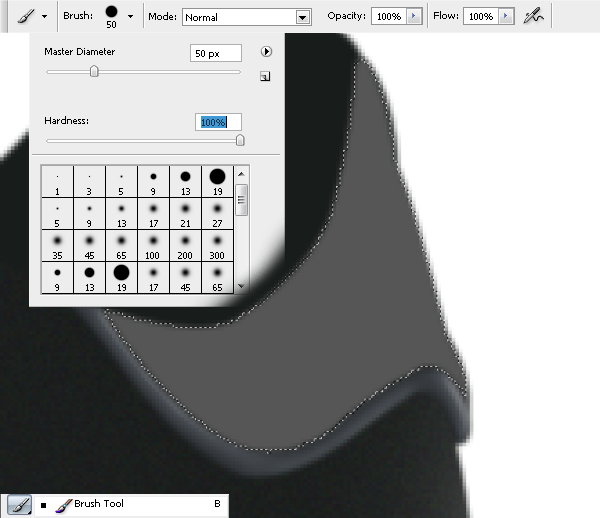
Add some shadows with a black brush with these settings.

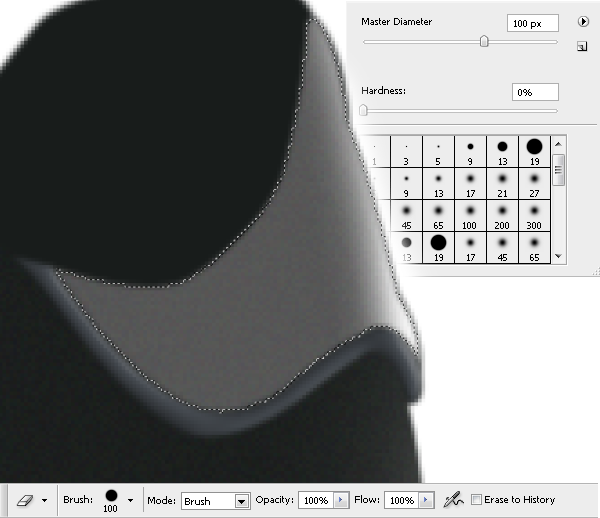
Step 38
Use the Eraser Tool (E) with the settings below to erase a little from the shadows.
Step 39
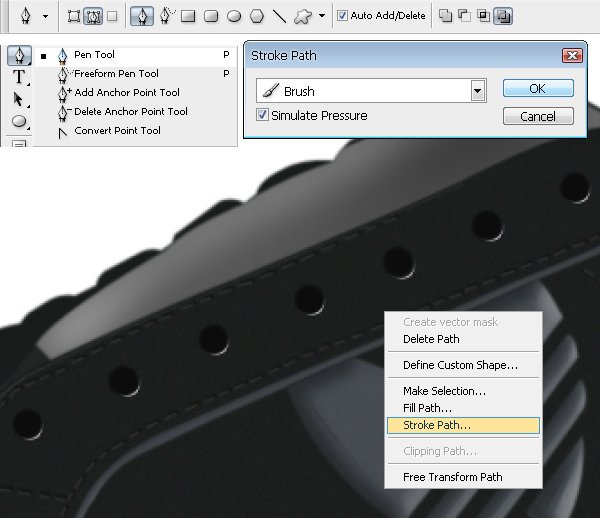
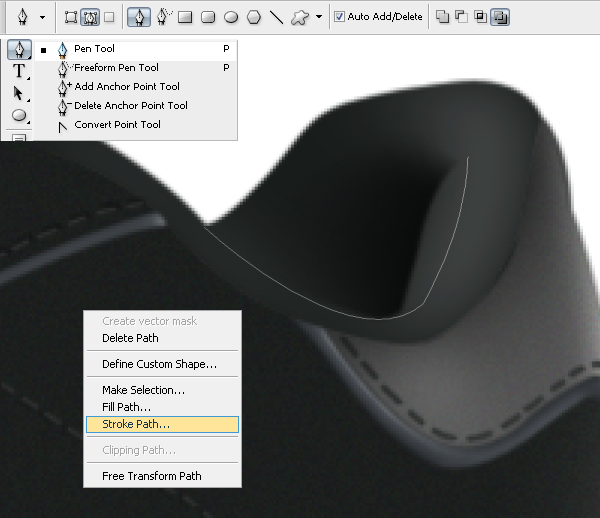
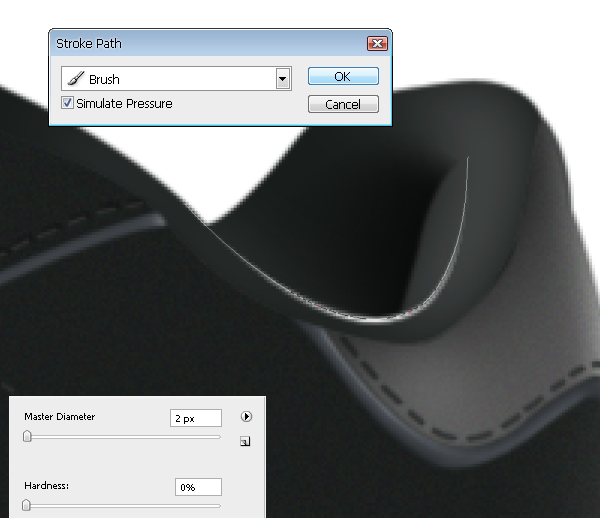
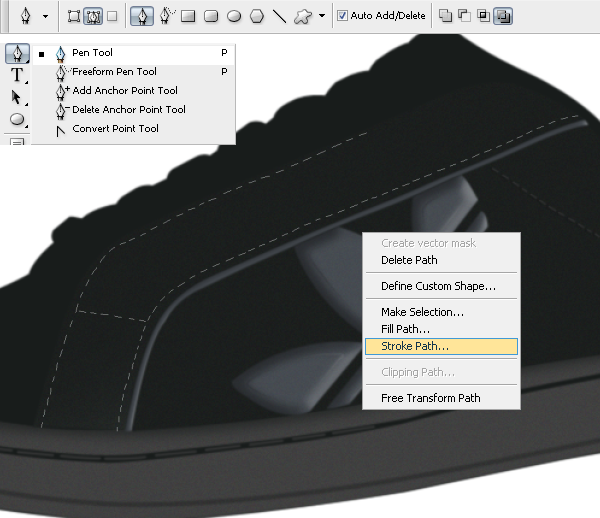
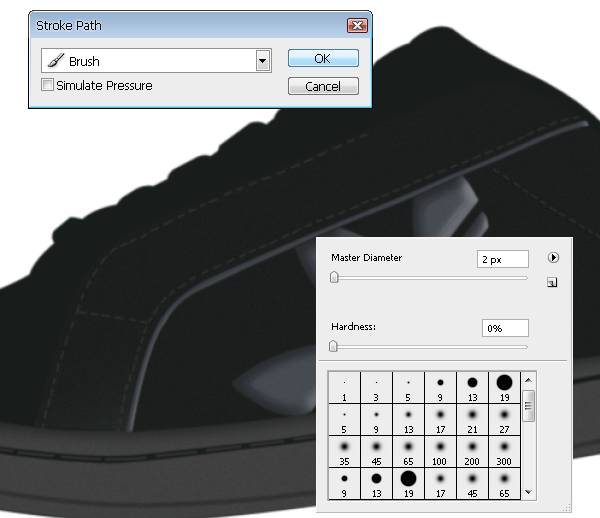
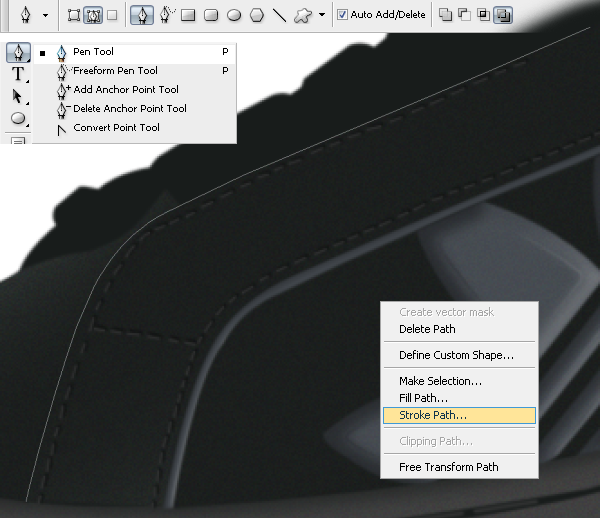
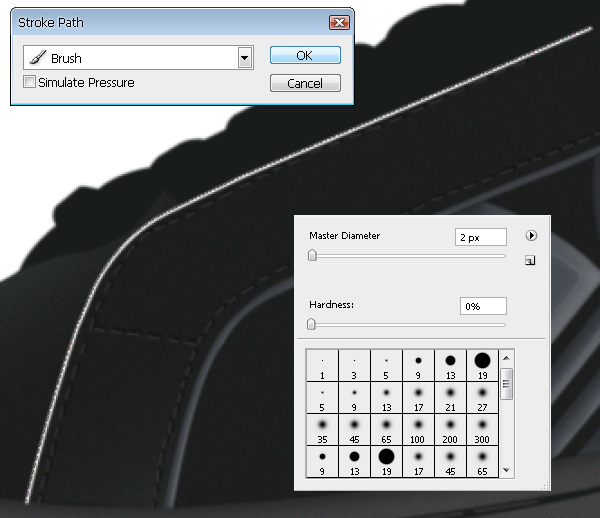
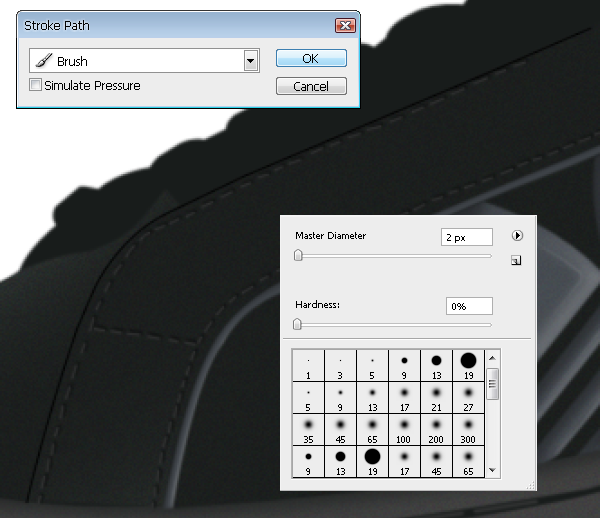
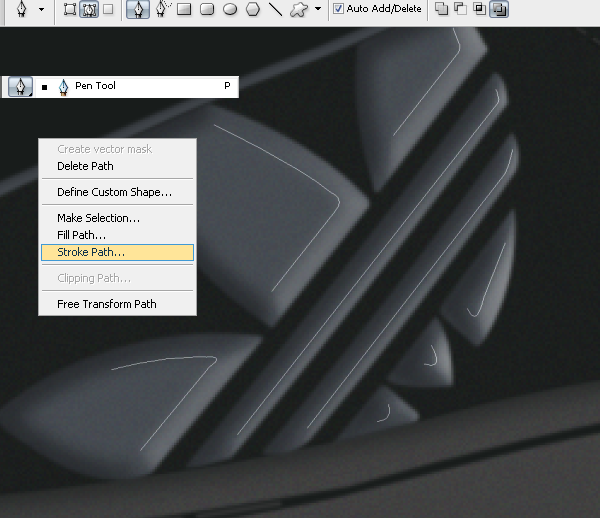
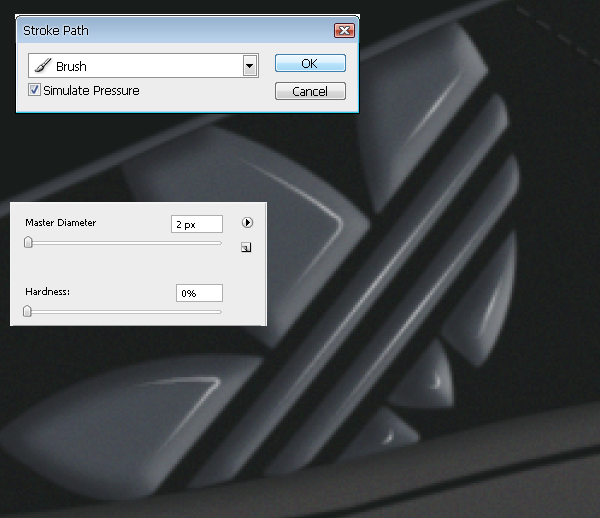
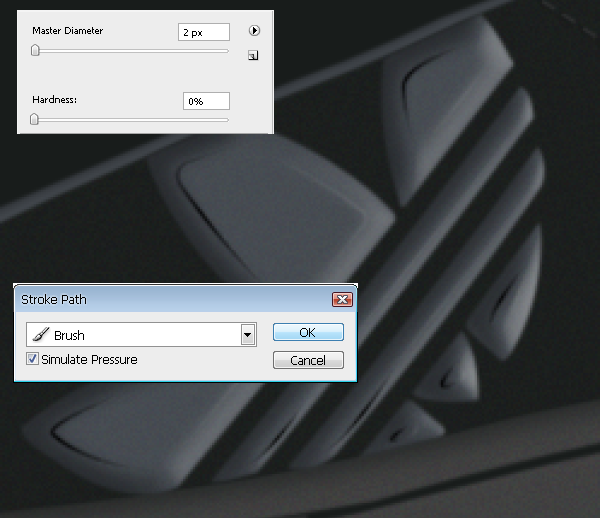
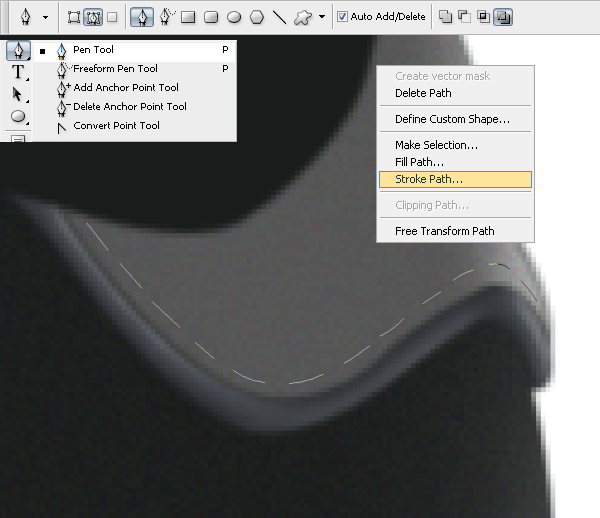
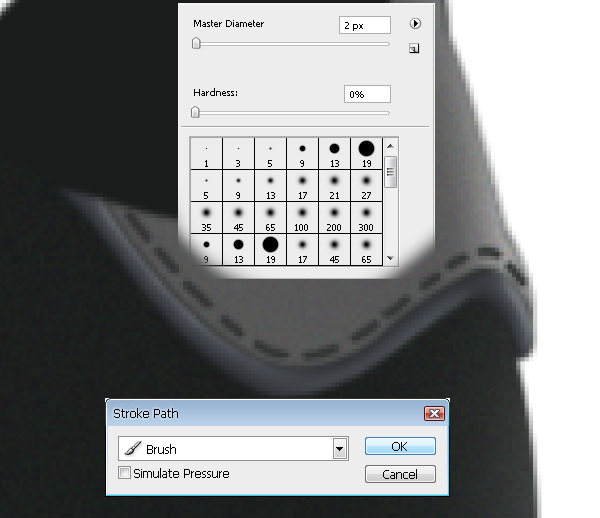
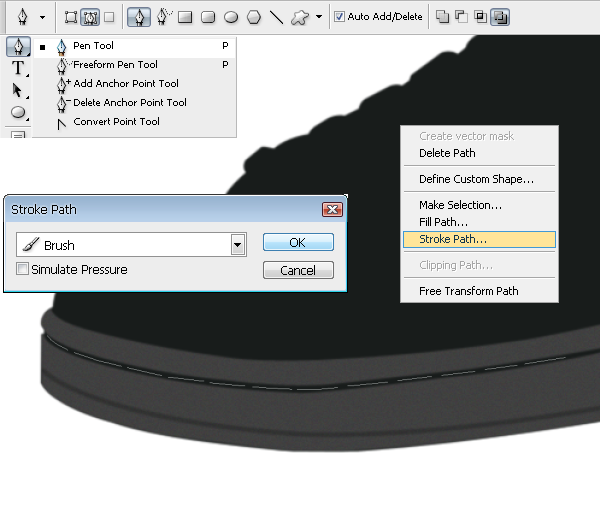
Make a new layer and a path with the Pen Tool. Right click on it then select “Stroke Path”.

Enable the Simulate Pressure option then click OK to create the white stroke.

Step 40
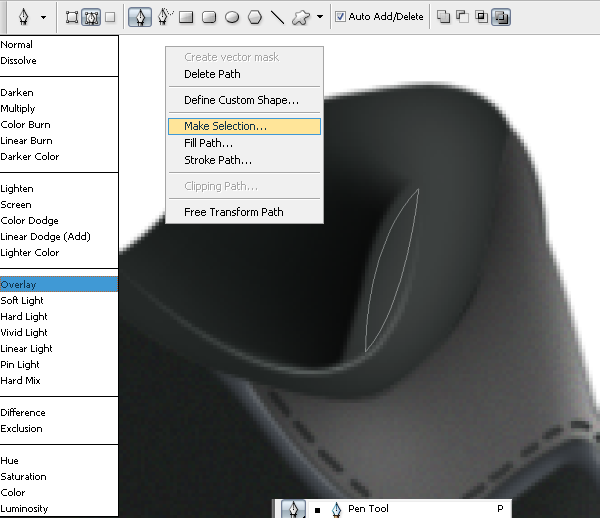
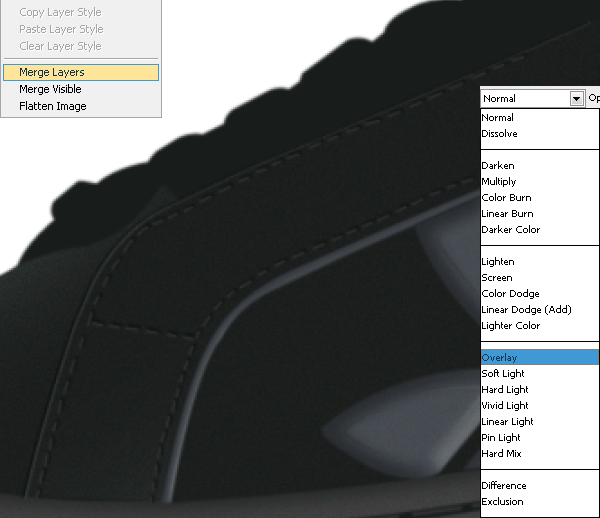
Set the blending mode for the layer with the white stroke to Overlay. Make the next path then right click > Make Selection.

Add some black color to the right side of the selection.

Step 41
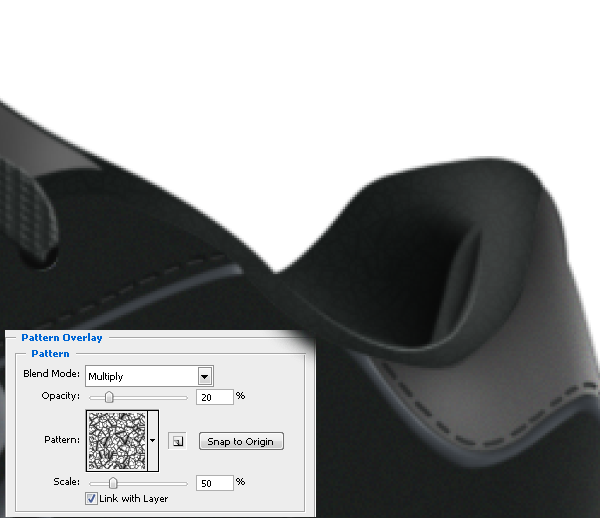
Select the layer created in step 35 and apply the next pattern with the settings as you see in the next picture.

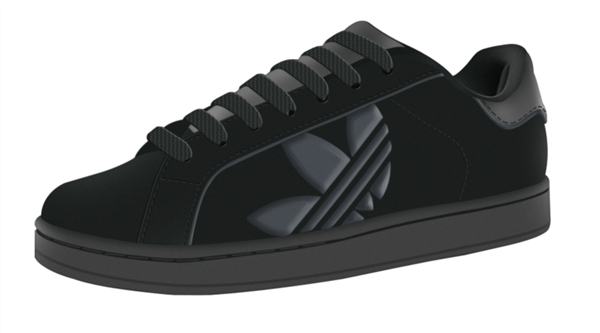
Final Results

Source: photoshoptutorials.ws
-
Step 21
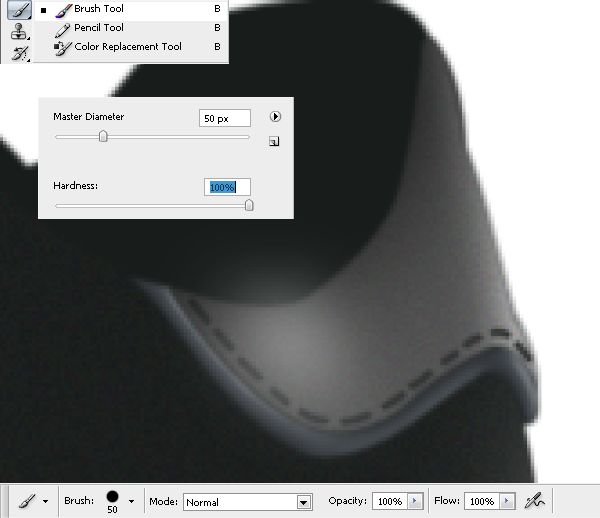
With the Pen Tool (P) make a path.

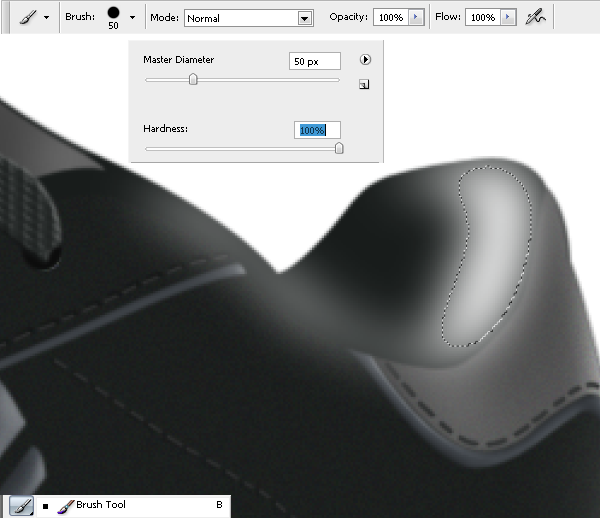
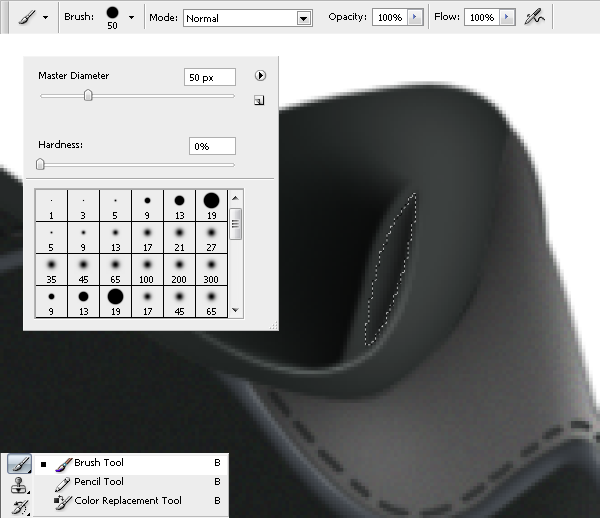
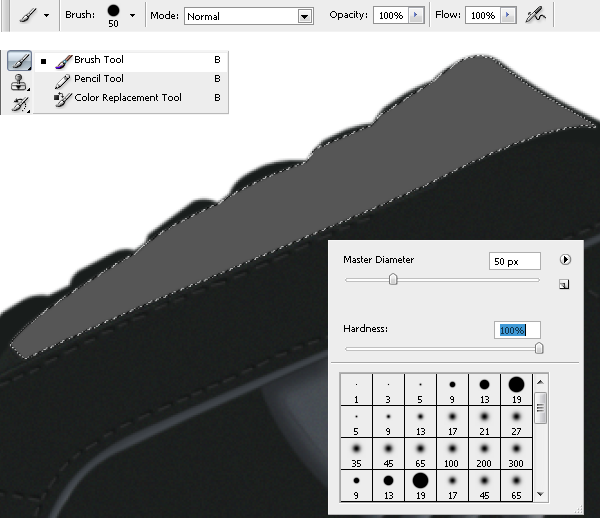
Right click on the path then choose Make Selection. Add a 50 px white spot in our selection with the Brush Tool (B)

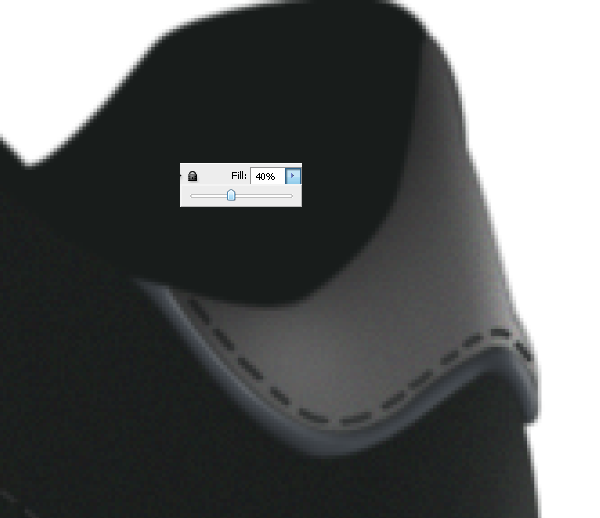
Decrease Fill to 40%.

Step 22
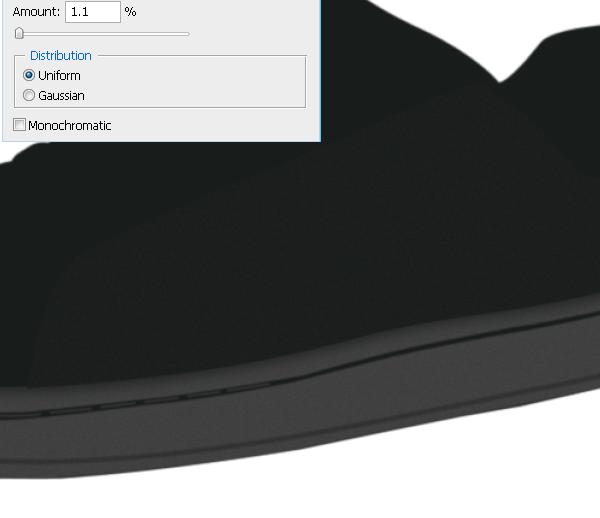
In a new layer (Ctrl+Shift+N), make the selection of a path created with the Pen Tool (P).

Fill the selection with color #1b1e1d.

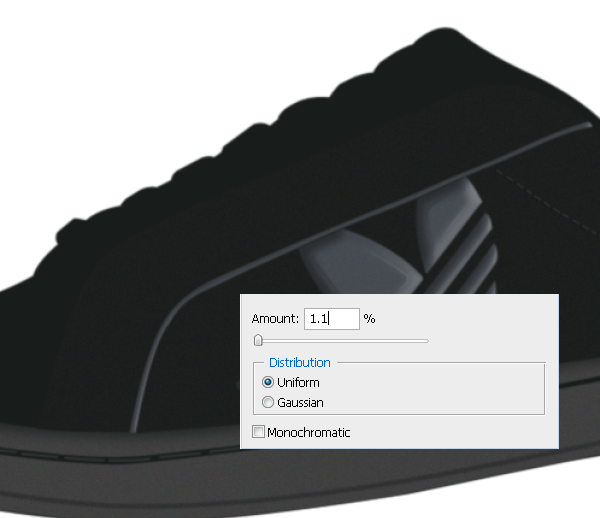
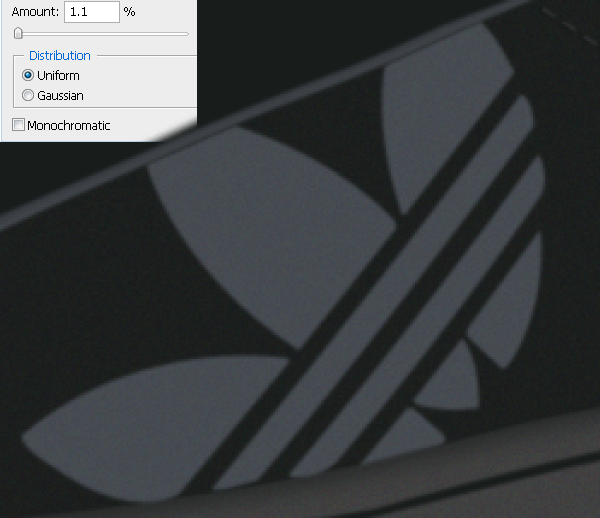
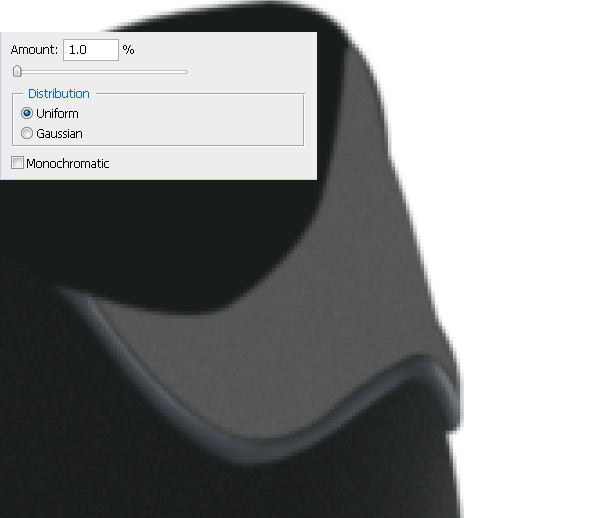
Choose Filter > Noise > Add Noise enter 1.1% for Amount.

Step 23
Use the Brush Tool (B) to add some highlights to the bottom of the selection in a new layer (Ctrl+Shift+N).

Set the blending mode for the layer on Overlay.

Step 24
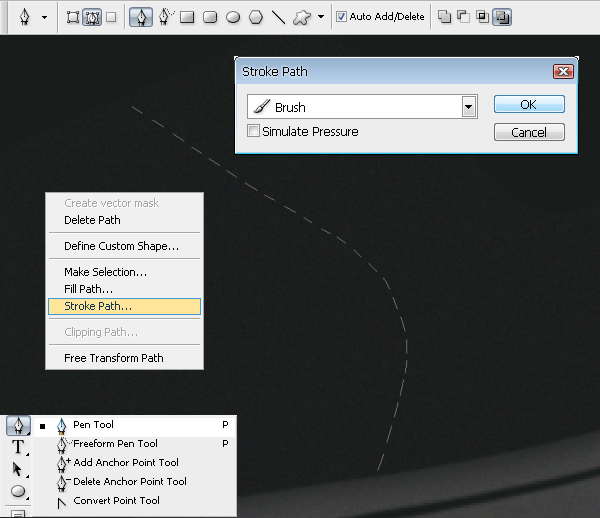
Make some paths with the Pen Tool (P) as in the picture below. Right click on the path then choose Stroke Path.

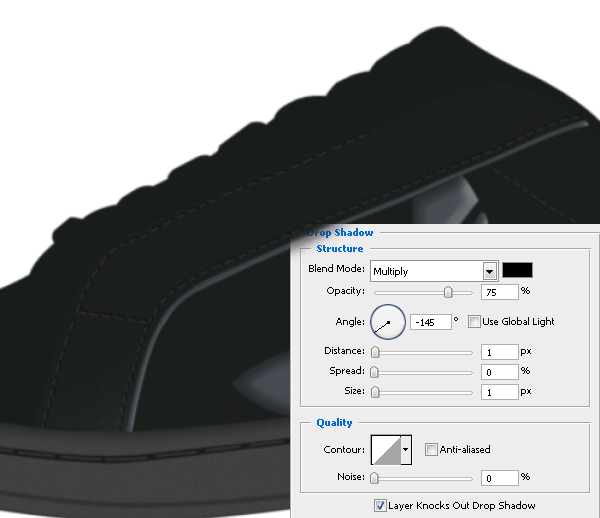
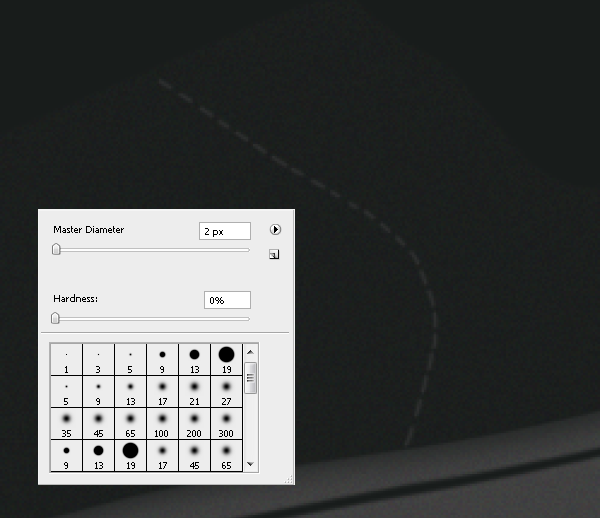
Add some 2px #2f3030 strokes

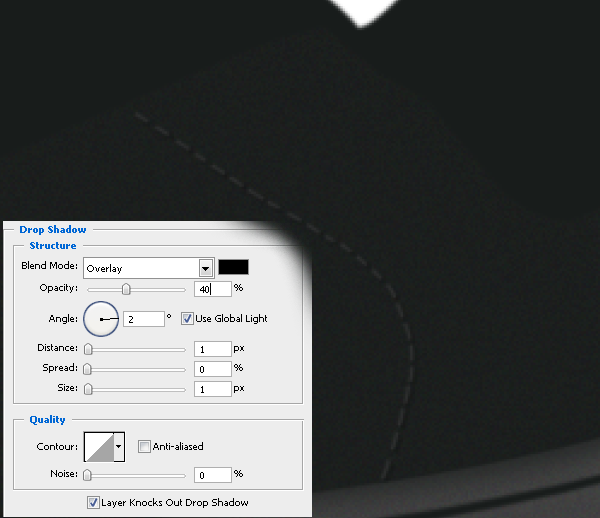
Go to Layer > Blending Options > Drop shadow and enter the settings that you see in the following image.

Step 25
Make a path with the Pen Tool (P) then right click on it and select “Make Selection”.

Fill the selection with a gray color such as #1b1e1d.

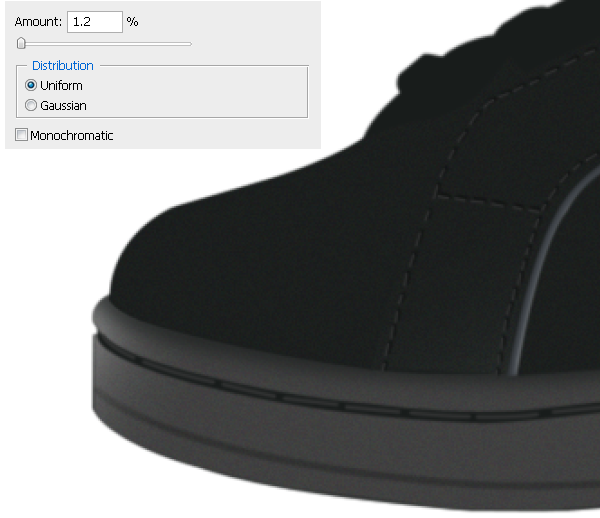
Filter > Noise > Add Noise and use 1.2% for Amount.

Step 26
Make the next selection in a new layer. Add some highlights with the Brush Tool (B) in white.

Set the blending mode for the layer on “Overlay”.

Step 27
New layer (Ctrl+Shift+N). Create the next path with the Pen Tool (P). Right click then choose Stroke Path

Add a 2px white stroke.

Step 28
Add a 2px black stroke.

Merge the two layers then set the blending mode for the merged layer on “Overlay”.

Step 29
Create a path with the Pen Tool (P). Right click then choose Make Selection.


Fill in the selected area with with #565656.

Step 30
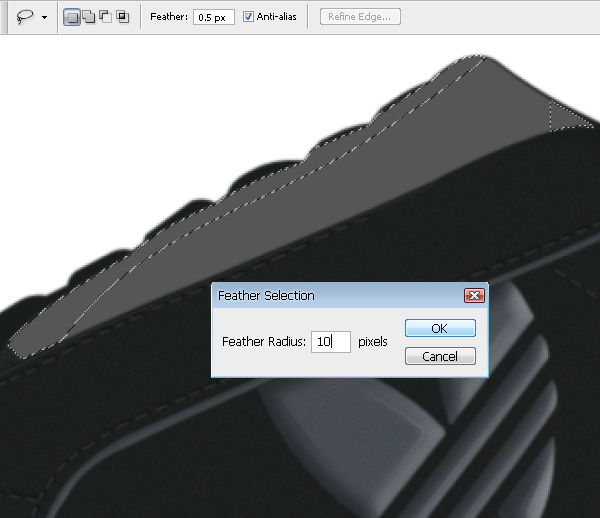
Create a selection with the Lasso Tool (L) with a 10px Feather Radius.
-

Add a 2px gray #2f3030 stroke on the side.

Now right click on the layer we just created > Blending Options > Drop Shadow, and enter these settings:
Blend Mode: Overlay
Opacity: 40%
Angle: 2*
Distance: 1px
Spread: 0 %
Size: 1px

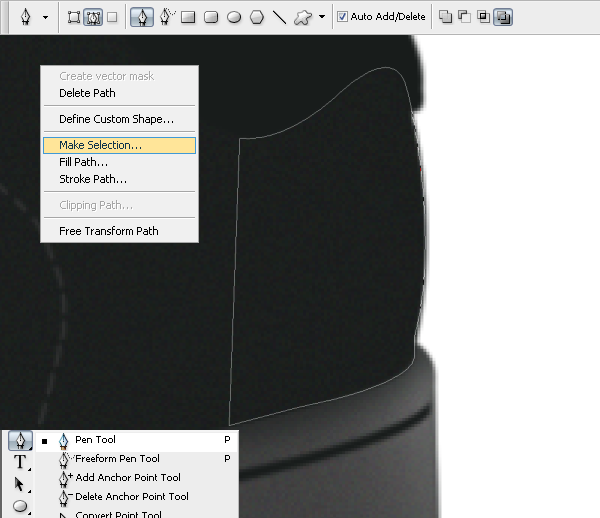
Step 11
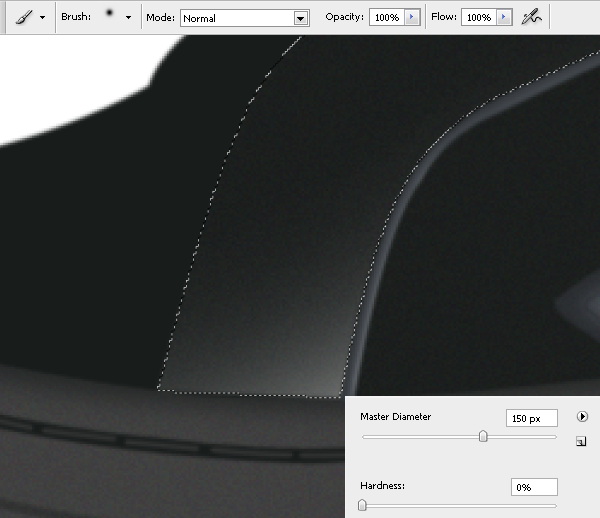
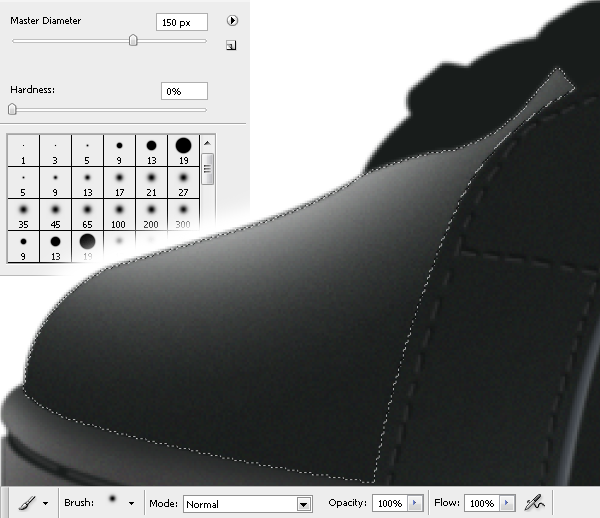
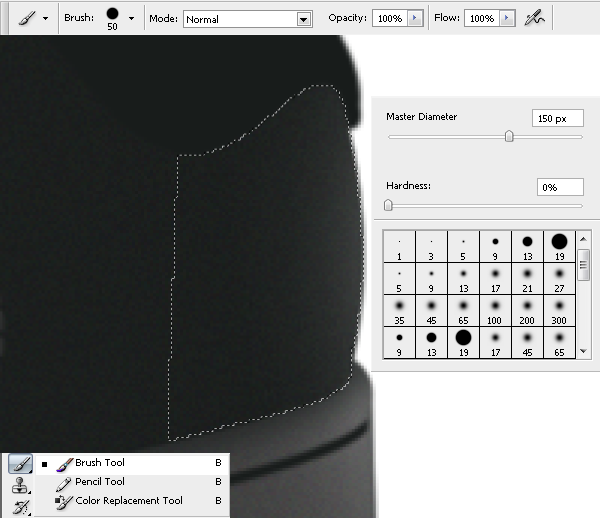
Use the Pen Tool (P Key) to make a path, then right click on it and choose “Make selection”

Use the brush tool with a 150 px diameter and add some highlights in a white color in the selection.

Step 12
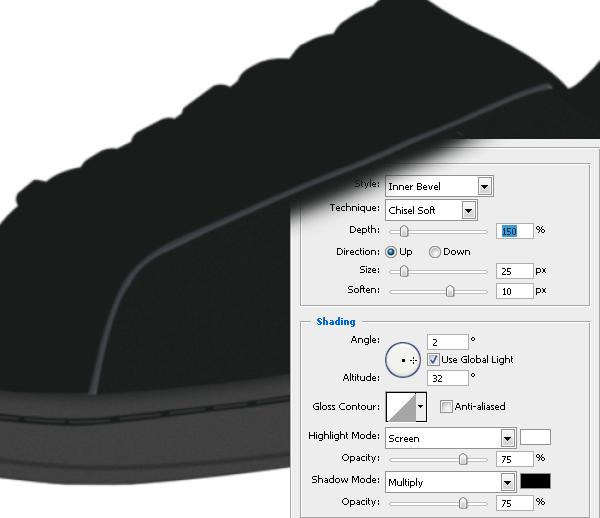
Use the Pen Tool (P) to make a path in a new layer (Ctrl+Shift+N). Make a selection.

Fill the selection with a gray color such as #464b51.

Right click on the layer > Blending Options > Bevel & Emboss:
Style: Inner Bevel
Technique: Chisel Soft
Depth: 150%
Direction: Up
Size: 25 px
Soften: 10 px
Angle: 2°
Altitude: 32°

Step 13
Use the Pen Tool (P) to make the next path in a new layer (Ctrl+Shift+N). Right click on it and choose “Make Selection”.

Use the Brush Tool (B) to fill the selection with a gray color; I used #464b51, but it’s up to you.

Right click on the layer and go to Blending Options > Bevel & Emboss and enter the settings from the picture below.

Step 14
Make a new layer (Ctrl+Shift+N). Then use the Pen Tool (P) to make a path, then right click on it and choose “Make selection”.

Fill the selection with color # 464b51 with the Brush Tool (B).

Go to Filter > Noise > Add Noise and enter the settings from the following picture.

Right click on the layer, and go to Bevel & Emboss and enter these settings.

Step 15
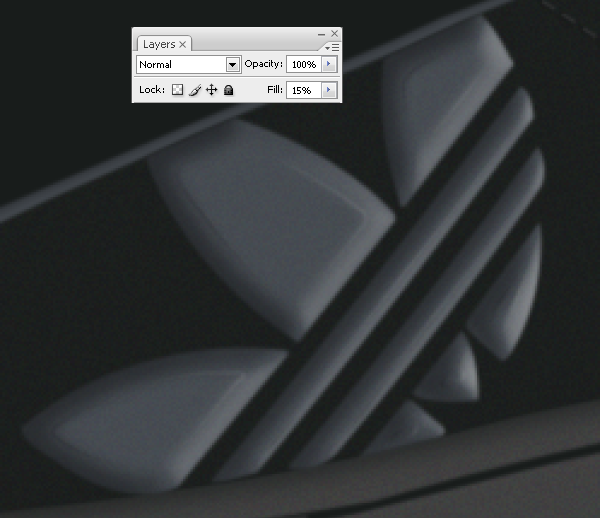
Use the Pen Tool (P) to make the next paths in a new layer.

Right click on the path and click on “Stroke Path”. Have simulate pressure ON, and you should have something like this as in the picture.

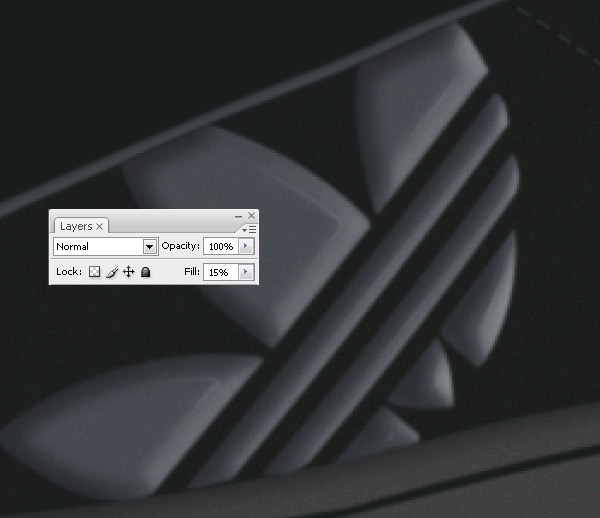
Decrease Fill to 15%.

Step 16
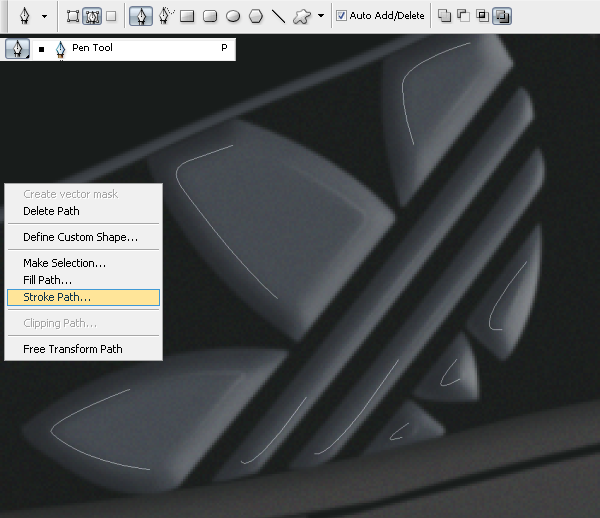
Again use the Pen Tool (P) to make some paths like in the picture below. Right click > Stroke Path

Add a 2px black stroke.

Decrease Fill to 15%.

Step 17
Make a path with the Pen Tool (P). Right click > Make Selection.

Fill the selection with the Brush Tool (B) with a gray color such as #565656.

Filter > Noise > Add Noise and enter 1% for Amount.

Step 18
Make a new layer. Then right click > Make Selection.

Use the Brush Tool with a white color to highlight the right part as you see in.

Set the blending mode for the layer on Overlay.

Step 19
Make some paths with the Pen Tool (P), then right click > Stroke path.

Add some 2px #333535 strokes.

Step 20
Add some shadows with the Brush Tool (B) in black to the top of our selection.
-
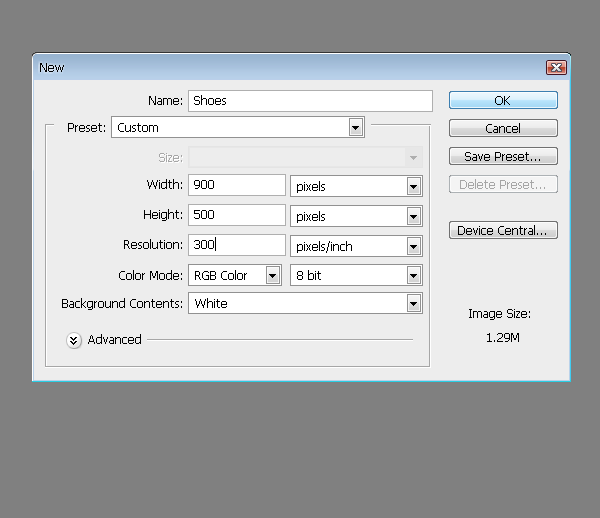
Step 1
First thing first: create a new image (File > New) with these dimensions.
Width: 900 pixels
Height: 500 pixels
Resolution: 300 pixels/inch

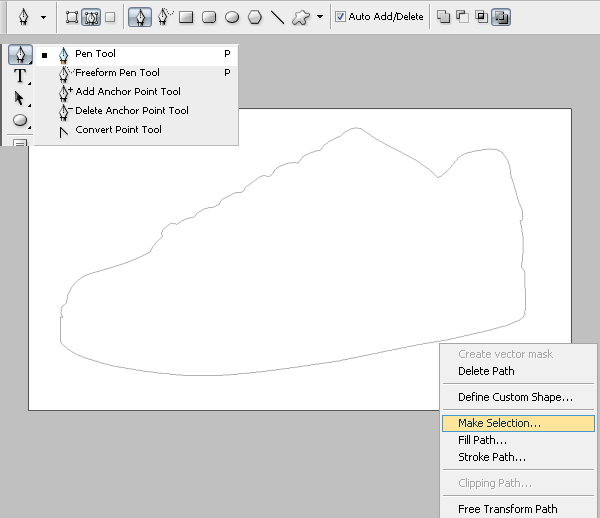
Step 2
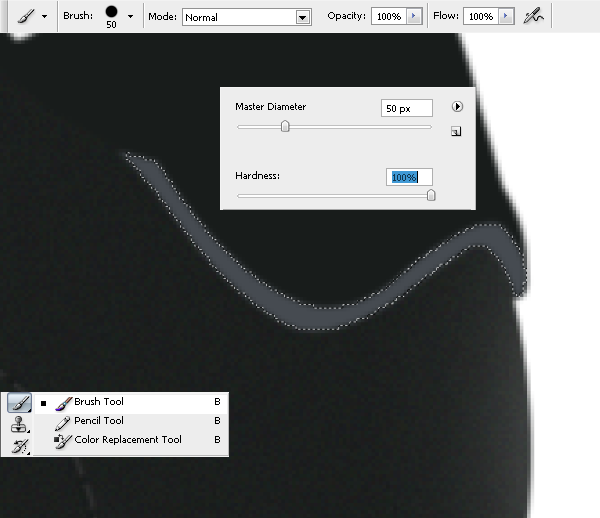
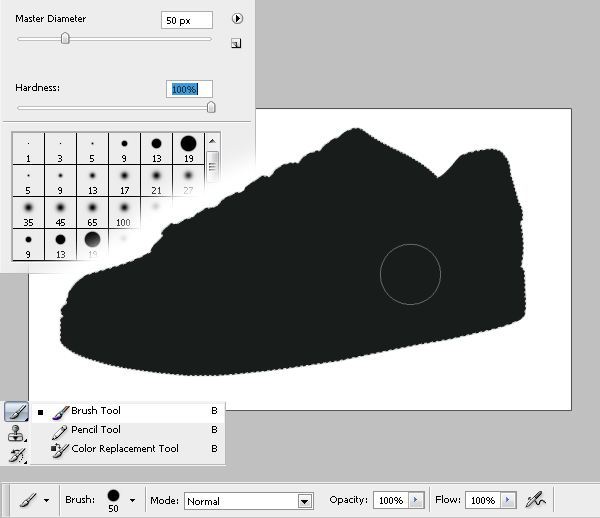
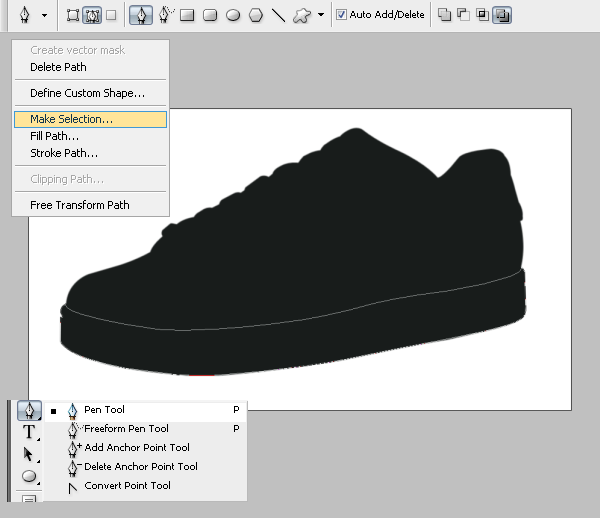
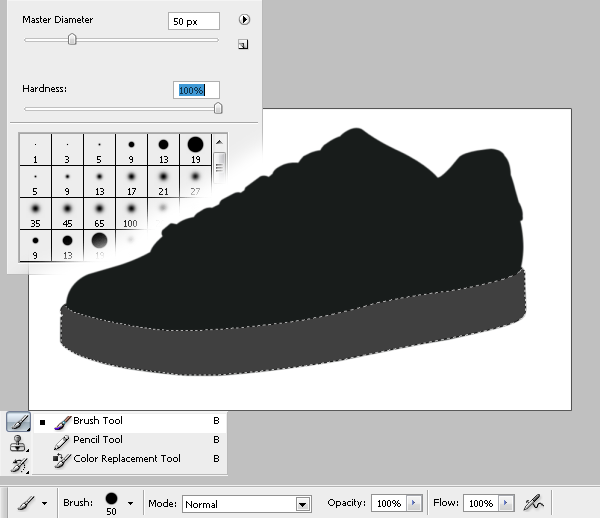
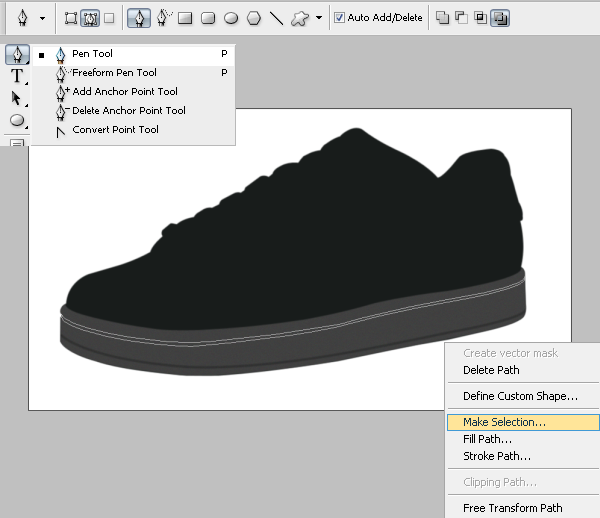
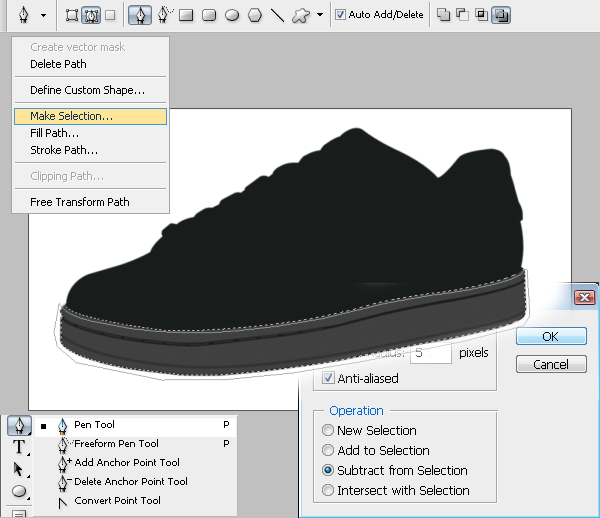
Use the Pen Tool (P key) to make a path as what you see in the picture below. Then right click on it and choose “Make Selection”.

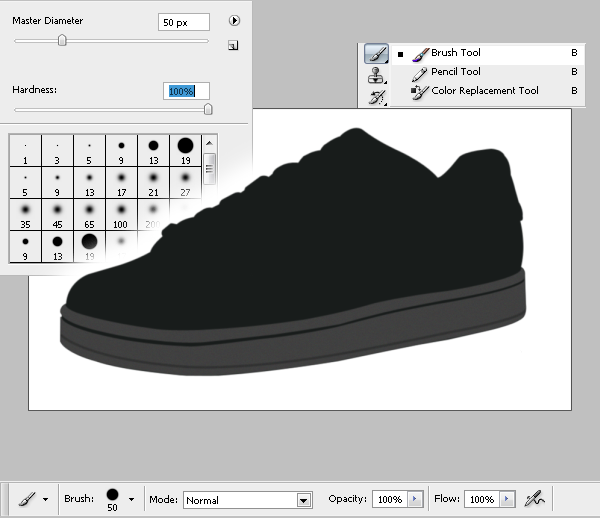
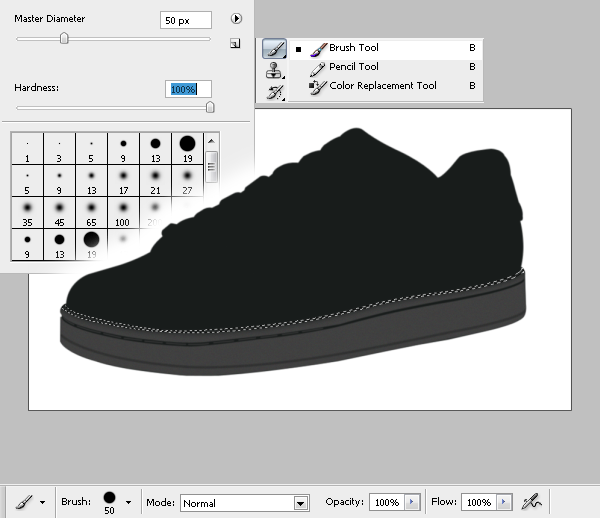
Use the Brush Tool (B Key) with the settings below, and fill the selection we just created with a dark gray color such as #181c1b.

Step 3
Use the Pen Tool (P key) to create a path. Right click on the path, and select “Make Selection”.

Fill the selection with a gray color #3d4444.

Step 4
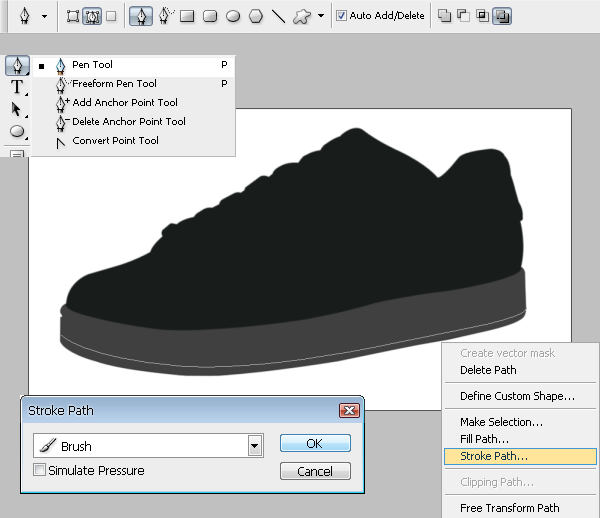
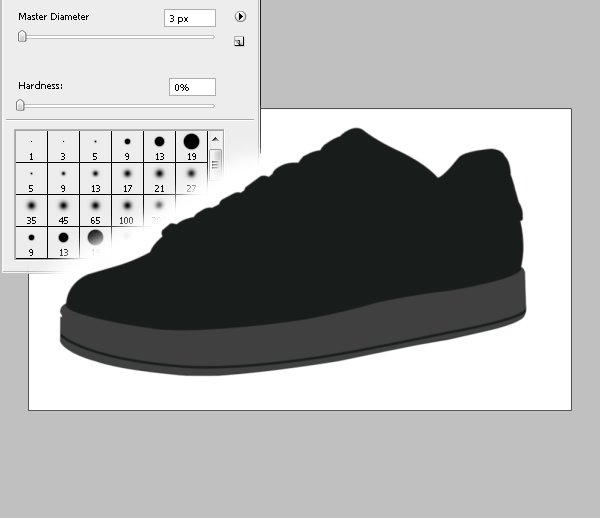
In a new layer (Ctrl+Shift+N), make a path as in the picture below with the Pen Tool (P key). Right click on it and select “Stroke Path”.

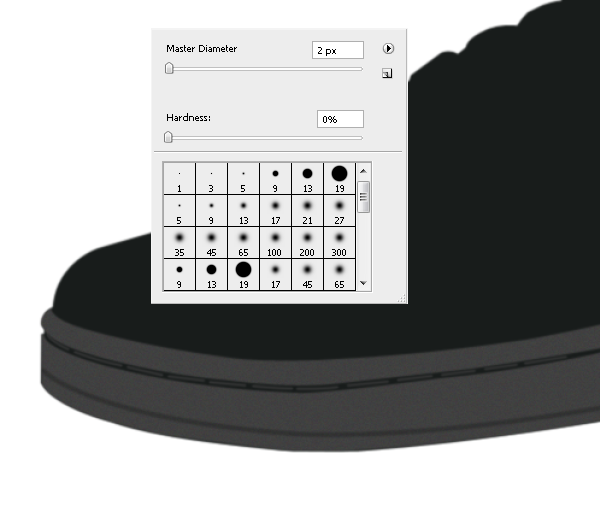
Use these Brush Tool settings for the stroke:
Master Diameter: 3 px
Hardness: 0 %

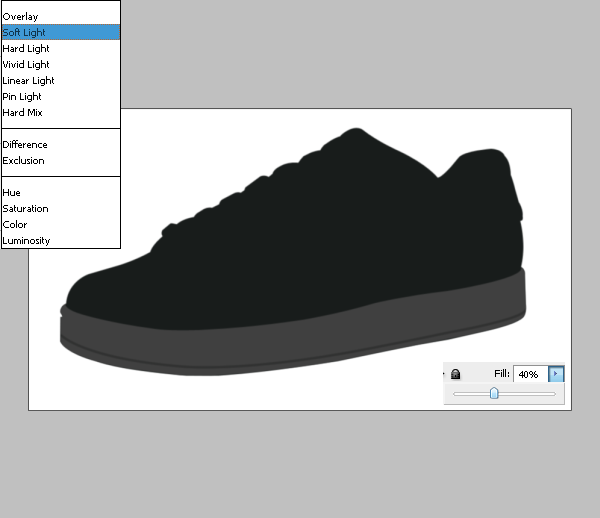
Set the blending mode for the layer on “Soft Light” and decrease the “Fill” option to approx. 40%.

Step 5
Again use the Pen Tool (P key) to create a path, then right click on it and choose “Make selection”.

Fill the selection utilizing the Brush Tool (B key) in a dark gray color #181c1b.

Step 6
Create paths with the Pen Tool (P key), then right click and select the “stroke path”.

Use a 2px #2f3030 for the stroke.

Step 7
Make a selection with a 5px Feather.

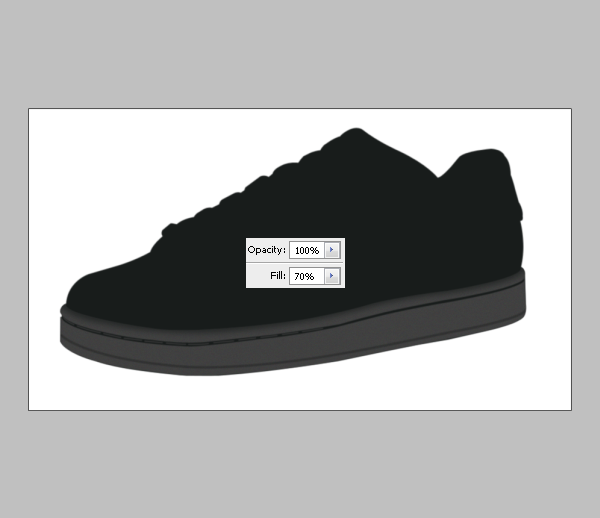
In a new layer (Ctrl+Shift+N), fill the selection with a dark gray color #181c1b,

then decrease “Fill” to 70%.

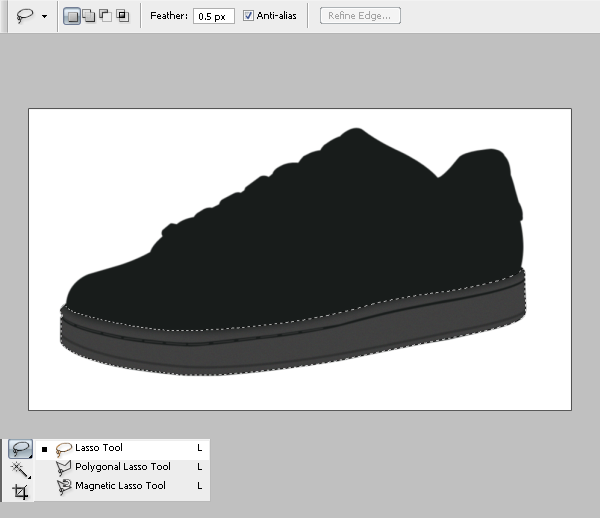
Step 8
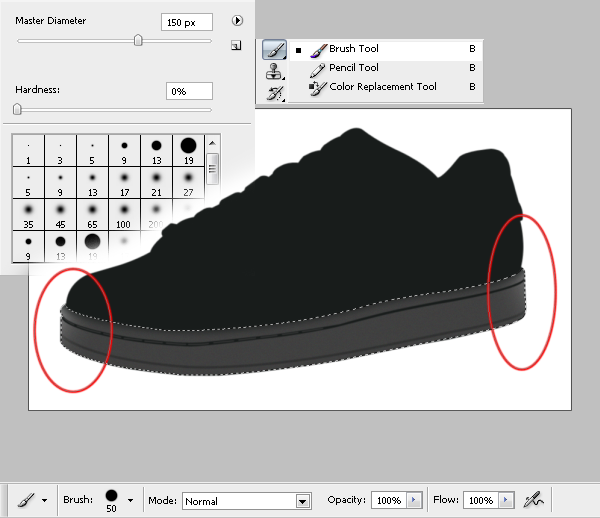
Make the next selection with the Lasso Tool (L key) with a 0.5 px Feather.

Use the Brush Tool (B key) with a huge Diameter such as 150px, and add some highlights in white in the designated places.

Step 9
Use the Pen Tool (P key) to make a path, then right click on it and choose “Make selection”.

Fill the selection with color #1b1e1d with the Brush Tool (B key).

Go to Filter > Noise > Add Noise and enter 1.1 % for Amount.

Step 10
Create a new layer (Ctrl+Shift+N). Make some paths with the Pen Tool. Then right click and select “Stroke Path”.
-
Kserei kaneis pos bazw Auto message sto msn?
Katarxin bale [GR] tag sto title sou...
Otan bazeis katastasi "Den Briskomai ston upologisti" anoigi ena parathiraki kai sou leei na baleis ekei oti thes san auto message.
-
Thanks all for your time! AndroniX is the winner! Gj buddy, your skill is awesome! +1 karma!
@For all others
Well setekh gonna give me my adena back, (40k) also maybe i will take my reward from the mxc banner (100k) i will send from 10k adena to the ppl that tried!
Thanks,
Morian
-
Topic moved to proper section.
http://www.maxcheaters.com/forum/index.php?topic=64749.0
This one works fine for me.
-
@MixMasteR is a really very good try. Really !
@AndroniX you own! For sure if i see something better from you ( i mean a sig with a render) and all your imba stuff you will be the winner.
Use this one http://i51.tinypic.com/2bdtfs.jpg if you want to do a second try for me. (also with blue theme again!)
Thanks




Why this topic is sticky?
in Report Section
Posted
Yeah, i am informed....
yeah... But at least an update will be nice idea lol.