


unqART
-
Posts
1,221 -
Credits
0 -
Joined
-
Last visited
Never -
Feedback
0%
Content Type
Articles
Profiles
Forums
Store
Posts posted by unqART
-
-
So why only two sections?There's a panic out there!We were promised photoshop moderators and boards' expansion but nothing. . .
i have 2 day's here and i havn't see any post buy admin .. i hope to see some changes in this forum ..
-
Meng,you don't wanna know.I feel the same about photoshop boards.
yes and the photoshop section is one of the most viewest here!
-
I see in forum one fail the World of Warcraft Marketplace is one section with 24 Topics and Dota Section who are one of most famous games and has 316 Topics is Sub Boards .. i hope to change this .. are 65k members and the 10k for sure play dota!
thx -WraithBand
i don't know if the post is in right section but any way!
-
best summer hit!
-
Ok Guys First Start with credits .. credits goes to me and to JooN is one guide for one event in one forum ok lets star
Krobelus, the Death Prophet
1. Goal and Hero Concept
Goal: The goal of the guide is simple: to show how a properly played death prophet can change the game through proper build and knowledge of the hero. I won't be going into every single detail. I will try my best to advocate certain concepts that I feel must be understood in order to fully utilize a great hero like the death prophet.
My personal concept of the death prophet determines how I build and play the death prophet. I see her as one of the strongest pushers who depend on items to function well. This concept will be the guiding light in understanding where my reasoning comes from.
It is very important to keep the hero concept in mind. While many may disagree on many elements of a guide, if they agree on the concept or the role of the hero, then the disagreements tend to be smaller. Constructive discussion can then take place because the concept is the same in both minds.
2. Hero Overview
Base movespeed is 285.
Base STR is 19 + 1.8 per level.
Base AGI is 14 + 1.4 per level.
Base INT is 20 + 3.0 per level.
Base Damage is 39-51.
Attack Range is 600.
3. Hero Abilities

Carrion Swarm
Sends a horde of bats to damage enemies.
Level 1 – 100 damage
Level 2 – 175 damage
Level 3 – 250 damage
Level 4 – 300 damage
Mana cost: 105 / 120 / 140 / 165. 9 second cooldown at all levels.
Silence
Stops all enemies in a target area from casting spells.
Level 1 – Lasts 3 seconds.
Level 2 – Lasts 4 seconds.
Level 3 – Lasts 5 seconds.
Level 4 – Lasts 6 seconds.
80 mana cost and 14 second cooldown at all levels.
This is a very strong skill that you MUST master. It will save your allies and yourself many times and it will grab your team kills that would be impossible without this skill. This is the first and foremost skill that you must master and abuse. Having an AOE silence is a great asset in any team.
Witchcraft
Increases the potency of each of Krobelus’ spells:
Passively increases movement speed by 3/6/9/12%.
Each level of witchcraft does the following:
Carrion Swarm: Decreases cooldown by 1 second and mana cost by 5.
Silence: Decreases cooldown by 1 second, starting from level 2 witchcraft.
Exorcism: Increases the number of spirits as follows:
Exorcism without witchcraft: 5/10/16 ghosts
Level 1: 6/11/16 ghosts
Level 2: 7/13/18 ghosts
Level 3: 8/14/20 ghosts
Level 4: 9/16/23 ghosts
Total effect of level 4 witchcraft on level 4 skills:
Carrion Swarm: Mana cost - 145. Cooldown - 5 seconds
Silence: Cooldown - 11 seconds
Exorcism: 23 ghosts
Witchcraft is an icing on a very awesome cake. The biggest noticeable advantage of taking witchcraft is the number of spirits increased and movement speed boost. A very solid skill IMO. It bumps your movement speed up to average and let’s you cast carrion swarm without too much hindrance to your mana.
Exorcism
Unleashes evil spirits to attack your enemies.
Level 1 – Summons 5 evil spirits.
Level 2 – Summons 10 evil spirits.
Level 3 – Summons 16 evil spirits.
Mana cost: 200 / 300 / 400. 100 second cooldown at all levels.
Your ultimate pushing ability. This skill absolutely demolishes towers. Exorcism is the reason why you’re built as a super pusher and it is also the reason why you will be horribly focus fired in team battles.
Part II – Skill and Item Build
1. Introduction to Build
The focus of my build is to make you a strong pusher. Nothing else. We will turn that bony, fragile DP into a meaty, durable DP in order to stay alive in the midst of a team battle with her spirits unleashing hell.
2. Recommended Skill Order
Level 1 - Silence
Level 2 - Carrion Swarm
Level 3 - Carrion Swarm
Level 4 - Silence/Witchcraft
Level 5 - Carrion Swarm
Level 6 - Witchcraft
Level 7 - Carrion Swarm
Level 8-9 - Witchcraft
Level 10 - Exorcism
Level 11 - Exorcism
Level 12 - Witchcraft/Silence
Level 13-14 - Silence
Level 15 - Stats
Level 16 - Exorcism
Level 17-25 - Stats
3. Skill Build Justifications
Silence at level 1 is usually desirable. Even at level 1, silence is a great skill that will help you against any weird first blood attempts. First level of carrion swarm is... pathetic. However, do get carrion swarm first if your team wants to do a surprise level 1 gank or something. In that case carrion swarm should be beneficial. In other cases, don't bother.
Carrion swarm should be maxed as it will help you farm and kill when the opportunity arises. Your reliance on that nuke early to mid game is inevitable.
At level 4, I personally take silence to the next level rather than add a level in witchcraft. I enjoy the increased AOE and the additional level of silence. Personal preference. One of the sections below should show a screenshot of the difference between level 1 and level 2 silence. If you're not comfortable with this, then take witchcraft. No biggie. I'm going to emphasize this again, it's not such a huge deal, you can go either way as long as it satisfies your way of playing. If you want to be able to spam carrion swarm a little bit more, then take witchcraft. If you're really on the defense, then take silence to another level.
Maxing out witchcraft after carrion swarm is a no brainer. Takes your hero to the next level.
Exorcism: There's a reason why you don't get exorcism at level 6. Simply put, it costs too much mana for minimum benefits. Many would disagree with this assessment and some might even call it a fatal flaw. It just puts a huge I'M HERE sign on top of your head and quite frankly, it's a horrible skill to gank with (which is the main focus of early/mid game, I mean generally, not referring to death prophet) and a horrible laning skill (which is the early game phase). However, if you're not comfortable with not skilling exorcism at level 6, then go ahead and skill it. It's not such a huge deal to be honest.
Some people vomit at the thought of getting exorcism at level 10/11. All I'm going to say is it depends on your playstyle and how the game is going for you. Like I said above, it is not such a big deal that you must get it at level 6 or you must get it at 10/11. Personally, it doesn't make sense to me. Early game laning and early/mid game ganking revolves around instant damage or reliable DoT spells that don't require you to be in the thick of battle. Most likely you will benefit from using the mana to cast carrion swarm (burst damage) rather than cast exorcism.
Exorcism is the centerpiece of death prophet. We build her around this skill. Exorcism demolishes towers in a matter of seconds and wrecks havoc in team battles. There's only one true way to counter exorcism: kill death prophet. BKB does not help. Disabling death prophet does not help. Even using song of the siren does not help (this actually helps death prophet, since you are giving her full immunity while ghosts are swarming around). You kill the spellcaster, and the ghosts disappears.
Another important thing about exorcism is that when the ghosts return to you, it heals you based on 25% of the amount of damage each ghost dealt while they were out. So this means you get a free heal if you manage to survive the entire duration.
4. Items
The item build will reflect death prophet's skill set. Durability, durability, durability. How do we counter exorcism? You kill her. That means increasing death prophet's survivability is increasing her potency in team battles. The main focus is durability. You want to be able to stay alive during the entire duration of exorcism for two reasons. First, the longer the ghosts are out, the more they wreck havoc. Second, if you manage to survive the entire duration even with 1 HP, the ghosts will return to you and heal you for a substantial amount.
Three ways to improve durability. First, increase her HP. Second, increase her armor. Third, increase her HP regen (in conjunction with HP and armor, not as a stand alone quality). Silence should help you with spells so magic resistance isn't as important. One exception: if the other team has necrolyte, get hood before shivas and after bloodstone. Reaper's scythe used solely to shut you down can be devastating, as seen by my second replay. I would even go as far as to say reaper's scythe is what did our team in. This holds true for other devastating spells like doom.
Get any item that fulfills any of the three criteria I mentioned. HP, armor, and HP regen. Another important criteria is the cost and the build up. This is very important for your first major item, but less so when you move on to bigger items.
My recommendation: Bloodstone, vanguard, bracers. Whatever floats your boat. Just keep in mind the three criteria I mentioned. As the game goes on, you do want to start getting bigger items, even if the cost and build up are horrible. Such items are heart, shivas guard, even skadi if you want to.
Focus on HP if your opponents are more spell oriented. Focus on armor if they have dangerous late game heroes that rely on physical attacks. The key is to strike a balance between HP and armor. HP regen is nice, but the first two have higher priorities. The best course of action is HP → armor. Nukes dominate early to mid game and physical damage starts to take over late game. Good thing about having HP is that it works against spells and physical attacks, but like I said earlier, there needs to be a balance.
The main point of the item build is that each and every item must be focused on increasing your survivability. Items that focus on other things such as disables (guinsoo), augmenting your killing power (dagon), and pure support items (mekansm) are not your priority. Durability, durability, durability. Keep that in mind.
Special word on Mekansm: Wrong item to put on death prophet. It drains too much mana, simple as that. You have one huge mana draining spell (exorcism) and two spammable spells (carrion swarm and silence). It's hard enough managing your mana without additional drainage.
Choice of footwear: Phase boots or boots of travel. Either one works fine. Phase boots if you think you can end the game fast (cheap and offers good mobility boost and ARMOR). Boots of travel if you think the game will drag on and you absolutely NEED the ability to jump around the map to push.
For those who do not like just mere “criteria,” this section will show you a core build, for the lack of better wording, to follow and then work upon that. This build reflects my personal choice.
Bloodstone
The only way to counter exorcism is to kill DP. It's a catch 22 situation for your opponents. Let you live ,and your ghosts wrecks them. Kill you (after a hard fight of course), and you heal your teammates around you. Of course, getting rid of the ghosts in the end is highly desirable, but you can't go down without a fight right? This item satisfies the HP requirement and let's you use your spells with ease, enabling you to throw down crucial silences without having to sacrifice other spell casting abilities. And as mentioned above, bloodstone's effect is highly desirable on a hero who is always a top priority on the must kill list.
Shivas Guard
Your HP is taken care of with bloodstone, next up is armor. Boosting your armor by 15 is no joke, not to mention the aura that decreases your opponent's attack speed. It's the perfect item to mitigate a late game DPS hero. The AOE slow that comes from shivas guard is also beneficial in chasing and running away in tight spots.
Boots of Travel
You need BOT to push. TP scrolls will not let you push, but BOT will. Being able to teleport anywhere your creeps are is crucial to any pusher. It also let’s you defend and farm by jumping lanes. The movement speed boost is superior to treads and you don’t need IAS on DP to warrant getting treads over BOT. However, get this item after you finish your bloodstone/shivas guard.
OR
Phase Boots
Up to you to decide if you're going to need the BOT's for that valuable mobility, or if you want that phase boots which is a blessing to your movement speed and a quick small boost to your pathetic armor. Most games I usually go phase boots, but sometimes I just rush the bloodstone and find myself wanting the mobility to jump around for pushes.
Part III – Strategy
Generally speaking, you want to stay in a safe lane. That means bottom/mid for sentinel or top/mid for scourge. Solo is more than possible, but death prophet is not the best solo so keep that in mind. Having some sort of HP regen (tangos, flasks) and stats (branches, gauntlet) is preferable. Having a chicken is a must, so if someone on your team doesn't buy one or they refuse to share with you, then be sure to buy one for yourself. Having items delivered to you allows you to stay in the lane at your best, and this is more so important if you're in the long lane (longer distance to your fountain).
Your priority is to level and farm. The faster you max out all your skills, the better it is for your team. Maxed silence as well as exorcism, boosted by witchcraft is a sight to behold when you out leveled your opponents. If you're in a horrible lane, rush a void stone ASAP. Use carrion swarm to farm, grabbing two creeps if possible. Stay back just enough to gain experience and have your finger ready to silence. Grab a couple clarities if you need. The key to surviving a hard lane is to grab creep kills and harass with your carrion swarm. The emphasis here is being able to farm and gain levels.
Two things to keep in mind. First, buy observer wards. You will not survive a gank easily. Death prophet is fragile early game with no escape mechanism. Avoiding ganks is the best way to survive.
Second, do not gank. Stay in your lane and farm. Hop around the map with TP scrolls to keep on farming. However, if your teammate comes to gank your lane, help out with carrion swarm and silence if needed. The main point is not to FORCE a gank, but to HELP if it COMES to YOU. Don't go out of your way to gank other lanes. Death prophet's ganking power is dismal. No stun, no slow, nor does she have a powerful single target spell. Exorcism is a bad spell to be used in ganks because it doesn't have burst damage that is important in ganks. The essence of ganking is swift and strong. The longer it takes to kill the enemy, the higher the chance their teammates will arrive to fight. This also ties in with another advice: don't get greedy for kills. That means no tower diving and no chasing for an extended period of time. If you have a choice between staying alive or killing someone and dying, then choose to live. Certain heroes are designed to gank till they die such as venge and lina. Death prophet is not one of them.
However, this does not mean stay in your lane and farm while your teammates are defending a tower. Always carry a TP scroll and TP in team battles to be of some help. Help out with silences and carrion swarms. If the team battle is big enough, use exorcism, even if it's level 1. In team battles, use carrion swarm sparingly depending on how much mana you have. If you have to debate between saving your mana for carrion swarm or silence, then choose silence. If your team is outright dominating the team fight, then use carrion swarm with discretion.
When you hit level 11, now is the time to start pushing the outer towers. By this time, all the level one towers should be down by at least half their HP and some second level towers might be down. Ask some of your teammates (your team's gankers) to accompany you so you guys can push down lanes. Your strength comes from tower razing so use it! If the tower is going to fall relatively easily, then don't turn on exorcism (tower with 50 HP does not warrant an exorcism).
Level 16 is the ripe time to start pushing in the base. This is the time where you are at your peak, and the longer the game drags on, the worse off it is for your team if your team depends on you to push. The most optimum situation is where you're level 16 with a decent item and in the making of another, while the other team's carry is lower and significantly underfarmed. The worst case is if the other team's carry is farming nicely and they have turtle heroes (pit lord comes to mind).
Your role in pushes is pulling off important silences, using carrion swarm to take down waves, and survive the full duration of exorcism. The goal of course, is the tower and raxes and to win the team fight. Do NOT stay in the front lines. Try your best to keep yourself as conspicuous as possible, even though this is near impossible considering all the ghosts attracting attention to you.
Part IV – How to use your Skills Effectively
1. Carrion Swarm
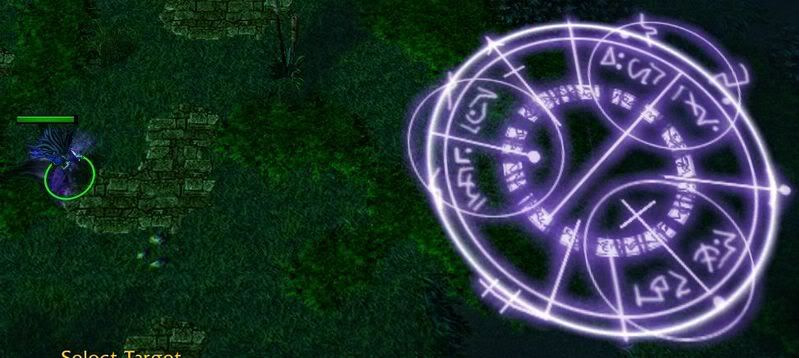
This is the range of carrion swarm. The distance between where the first observer ward is and DP is the maximum casting range without moving forward (600 casting range). It’s good to have a mental note of this range. As you can see, the range of this skill makes it easy to hit heroes with carrion swarm. You will rarely miss since the range is ungodly.
When you use carrion swarm to farm, don’t ever use it at the beginning of the creep wave. You’ll just mess things up. Always try to last hit the first creep that all your creeps are focusing. Then hit the ranged creep once and focus on a creep that your creeps aren’t hitting. This should grab you at least three creep kills.
Carrion Swarm mechanics:
- 110 starting AoE/700 distance traveled/300 final AoE. To sum it up, you can hit a unit up to 1,000 distance away from you (add 700 + 300).
2. Silence
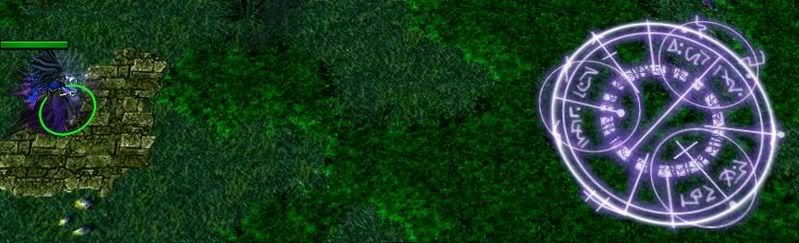
This is the maximum casting range for silence. You can tell right away that the range is imba. The AOE of this silence is level 4. Always try to position your silence to hit as many opponents as possible. You should never miss hitting silence since there is almost no casting time and the AOE is huge.
In team battles, this skill should always be in cooldown. It creates a huge advantage for your team so take advantage of it. Use it to stop channeling spells and use it to stop windwalkers and blinkers from escaping your teammates. Always aim this skill at a disabler or a nuker if your opponents are scattered and you just can’t get everyone in.
If you or your teammate are being chased, always remember that you can use silence to stop them from stunning, slowing, or nuking you.
Early game, you must be quick with your fingers to stop your opponents should they initiate a combo. The casting range for silence is larger than most, if not all spells that other heroes can dish out. Notable exceptions are swap, assassinate, rupture, and more that I can’t think of.
The key to using silence effectively is to use it calmly. What do I mean by that? It means don't silence your opponent when he already used his important spell. Most spells have more than 10 seconds cool down. Time that and then silence to “increase” their cool down time.
It also means use silence as a follow up. What do I mean by this? It means do not silence opponents who are in no position to use spells, i.e: caught in blackhole, reverse polarity. Use silence right before the spell is about to end. So if your enigma caught 5 of your enemies in a blackhole, turn on exorcism, use carrion swarm, and THEN silence when they are about to escape blackhole.
The key to silence is timing it correctly based on the situation, as mentioned above. It means do not panic and spam silence when it is obviously not needed. This also means you need some basic understanding of what spells other heroes have and their cooldown. This paragraph is just reiterating the previous two paragraphs, but I feel it is important to emphasize the GOAL of silence. You do not achieve anything by silencing the enemy when they have no spells to use. You do not achieve anything by silencing enemies who are in no position to use spells.
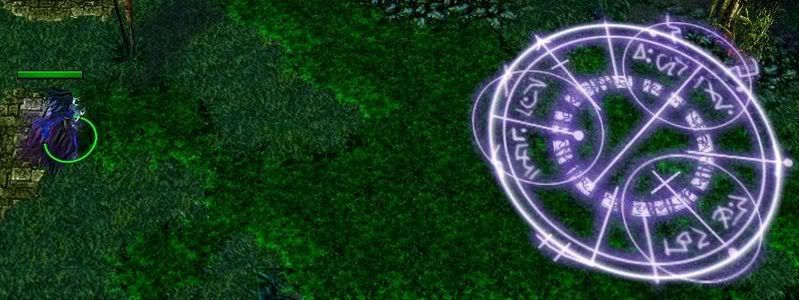
The following screenshot shows the difference between silence level 1 and 2. While not a huge difference, you gain more benefits from the second level of silence than adding the first level of witchcraft in the form of an additional second of silence and increased AOE.
Level 1 silence
Level 2 silence
Silence mechanics:
- Casting range: 900
- AoE of silence: 200/275/350/350
3. Exorcism
Only one way to effectively use exorcism: survive the entire duration. Oh, and not using it frivolously before a major push.
Exorcism mechanics:
- Spirits have 500 movement speed.
- The spirits circle around you in an AOE of 700.
- Spirits disappear if they are more than 2000 units away from death prophet.
- The spirits attack the target death prophet is attacking. So contrary to popular belief, they aren't always attacking random targets.
- Death prophet is healed 25% of the total damage dealt by each spirit after exorcism ends (and the ghosts have to return to you).
- Spirits do 43-48 hero damage. (So magic immunity [rage, BKB] does not work against spirits)
- Spirits attack anyone in in 900 range.
- Vanguard/stout shield block effect does NOT work against spirits.
tnx for reading credits: me and JooH -
-
tnx guys <3
-
i love this hero!
-
lock it plz this person is scamer .. now i give this post in xzone and say that are not the topzone .. and this man is scamer .. the files are by first svn are only 4 files ..
-
this forum has fun! im sure that will stay! :p
-
Hello gfx proZ! is my first time who open the photoshop .. i read one tut and i see some nice creations Here and i say hmm let's start :P
ok then! i use
and
and the finaly is this FAIL :P
-
-
Are you serious? great job with the guides if you make another one you will get +1 karma :)
(Mods let me karma him :D I want to give my 1st karma xD)
ohh tnx!
-
Introduction
Until recently, Medusa was never seen in action in competitive DotA games, and very rarely seen in even pub games. This was because of her horrible attack animation which led to poor laning, a very, very situational ultimate that anyone could Blink out of, and mediocre hp even in late game. So, why pick her now?
[*]Her attack animation was recently buffed. Now, she can creep and animation cancel decently.
[*]Blink dagger was nerfed, so enemy heroes now cannot just blink out when being Purged.
[*]Purge damages Warlock's Infernal by a ton.
[*]Purge is the only spell which can remove Omniknight's Repel + Guardian Angel combo on the enemy carry.
Hero Stats
Strength - 14 + 1.85
Agility - 20 + 2.5
Intelligence - 19 + 2.25
Starting HP - 416
Starting Mana - 247
Starting Armor - 1.8
Starting Damage - 44 - 50
Movement speed - 300
As you can see, Medusa's agility gain is high, her strength gain mediocre and her intelligence gain nearly as high as her agility gain. This allows her to use Chain Lightning in the lane often, without needing much mana regen items, if at all. Since her strength is quite low, we get two levels of stats at 2 and 4 to give her a slight boost. Overall, her stat gain is 6.6 which is awesome as a carry.
Skills
Medusa magically splits her shot into three arrows. These arrows deal a lower percent of her normal damage.
Level 1 - 45% damage
Level 2 - 55% damage
Level 3 - 65% damage
Level 4 - 75% damage
A pretty meh farming/pushing skill, get it after your Maelstrom to clear creep waves quickly.
Hurls a bolt of damaging lightning at a target enemy that jumps to nearby enemies. Each jump deals less damage.
Level 1 - 75 damage, jumps 3 times. Costs 90 mana.
Level 2 - 150 damage, jumps 5 times. Costs 105 mana.
Level 3 - 225 damage, jumps 7 times. Costs 125 mana.
Level 4 - 300 damage, jumps 9 times. Costs 145 mana.
Cooldown: 11 seconds.
A great harassing and farming skill. Low mana cost coupled with your relatively high int lets you use this skill often in the lane. Max this first.
Creates a shield that absorbs 50% of the incoming damage by using Medusa's mana.
Level 1 - .75 damage per point of mana.
Level 2 - 1.25 damage per point of mana.
Level 3 - 1.5 damage per point of mana.
Level 4 - 2 damage per point of mana.
This is what makes you such a tank later on. All you need to know is that you should turn on this skill permanently once it is level 3. It effectively doubles your HP provided you have the mana to sustain the shield. When you die and respawn, you also need to turn it back on. Get it after maxing Chain Lightning.
Some explanation:
Level 4 mana shield absorbs 50% of any damage, and uses a point of mana for every 2 damage taken.
Assume that you are nuked for exactly 300 damage. You will only take 150 damage, and 150/2 = 75 mana is taken away. Fair price, don't you think? If it was 3000 damage, thats when this skill really becomes truly valuable.
Casts a powerful anti-magic buff at a target enemy unit. Slows movement and attack speeds for 5 seconds.
Level 1 - Slows speed by a factor of 2. 12 second cooldown.
Level 2 - Slows speed by a factor of 3. 11 second cooldown.
Level 3 - Slows speed by a factor of 5. 10 second cooldown.
Deals 600/800/1000 damage to summoned units. ( THAT MEANS YOU, INFERNAL!)
Costs 60 mana at all levels.
This skill might seem underwhelming, but it's great. Due to its long cast range, you can single out anyone that strays a little too far from the 'safe' zone for your allies to pound on in team pushes. It allows you to gank. It severely damages Warlock's Infernal. It removes Repel and Guardian Angel. It costs 60 mana. What more could you possibly want?
Skill Build
1. Chain Lightning
2. Stats
3. Chain Lightning
4. Stats
5. Chain Lightning
6. Purge
7. Chain Lightning
8. Mana Shield
9. Mana Shield
10. Mana Shield
11. Mana Shield
12. Split Shot
13. Split Shot
14. Split Shot
15. Split Shot
16. Purge
17. Purge
Finish up with stats.
Skill Build Justifications
This should be the one and only skill build for Medusa. Chain Lightning is maxed first with a few stats as that is your only nuke and harassing skill. Purge is taken at 6 for a slow to help in ganks. Mana shield after Chain to make you tougher / longer-lasting, and finally Split Shot is maxed by the time your team is pushing.
Item Build
Finished Item Build
This build aims to get a fast Bloodstone as the core item. But before that, we need a means to farm that 5k, and we also need some damage before it. So, we get Maelstrom as it fulfills both requirements. BoT after Bloodstone is a no-brainer - helps farming and defending towers, etc. Split Mjolnir to make Butterfly later, since we all know Butterfly > Mjolnir. The build probably won't be achieved in a game if you're not godlike or something, but get up to Bloodstone at least.
Now comes the question: Why Bloodstone?
To be honest, I thought it sucked before I tried it, too. But think about it. Early perseverance for mana shield/lane-staying power. Tons of hp/mana from the Boosters. Quote from Patccmoi's Bloodstone guide:
Item stats:
+450 Hp
+400 Mana
+200% Mana regen
+6 Health/sec
It has 2 'abilities'. One is to accumulate charges. This is done through killing heroes. For every kill, you gain 1 charge (except when you have no charge, your first kill gives you 2). Each charge gives you a net +2 health/mana per second. While it's not much for health, it's actually HUGE for mana. You lose a charge every time you die.
So what does this mean? If you get even one kill (2 charges for the first), it means you get 4 mana/sec on top of the 200% mana regen. This is HUGE. Last hit 5 heroes with Chain Lightning, and you're in the realms of infinite mana as well as boundless hp regen. Both of these help your tanking prowess ENORMOUSLY. I have replay to prove it ^^. Just try it.
[cnter]Luxury Items[/Center]
Eye of Skadi
Permaslow, adds good HP, mana, some damage...no reason not to get it. Only drawback is that it comes very very late into the game. If you can farm it,
Linken's Sphere
Spell negation is always handy, coupled with extra regen.
Guinsoo's Scythe of Vyse
Hex is always good. Also gives more mana for your mana shield(not really needed, but meh..)
Optional Items[/center]
Hood of Defiance
In some games, the enemy heroes have tons of nukes all waiting for you the moment you show your face, lowering your HP down to nothing in a second. Hood gives you nearly a 50% resistance to those nukes (47.5%), and another 25% from mana shield. However you won't need it every game. It costs around 2000g, so decide wisely.
Black king Bar
Makes you an unstoppable god for 9 seconds. Get if you're being stunned to death all the time.
Strategy[/center]
Early Game
Grab your starting items and head to a lane, any lane. Just farm, and use chain lightning occasionally, and to kill heroes whenever possible. It's a very powerful nuke. Having trouble farming? Get your perseverance first. With Medusa's great animation now, I usually find no problem at all farming my Maelstrom and boots by the 20th minute.
Use Purge to Grab Kills
Even with your killing capabilities at level 6, don't concentrate too much on ganks and stuff. Let your teammates handle that. Your job is to farm and carry later.
Mid Game
Hopefully, you were able to farm your maelstrom, boots, wraiths, and a perseverance easily. You should have, anyway. Just form your bloodstone in this order --> Point, Vitality, then Energy boosters. I know there will be some problems with the slots, either buy them with a chicken or leave a wraith at the base. Not a big difference. Farm your bloodstone asap while helping your team defend with Maelstrom CL spam. At level 11 which is when you should have 3 Mana Shield, turn it on PERMANENTLY, no excuses. With this skill, I could solo two enemy heroes and a tower with more than half hp remaining.
NOTE: Hex and a few other skills MIGHT remove Mana shield, meaning you have to re-enable it. I'll check on that later.
Armed with your BoT, Split Shot, and Maelstrom, you should have no problem clearing/defending any creepwaves that might be coming up to your towers. Teleport to any free lane, farm farm farm, and finish up the item build. Hopefully, you should have at least 2 charges(1 kill) on your Bloodstone, which means that you = omfgimbabbq TANK. Just follow your team in pushes, purge whoever that comes out, push and win. Simple. Rack up those charges as much as possible to extend your ownage over the opposing teams.
Don't be afraid to solo heroes, you should own them easily. The only guy I ever had a problem against was Antimage, since he ripped up my shield like NP. Get a BKB in place of a Wraith if needed against like 5 stuns, although I haven't gotten it yet.
If your team manages to wipe out the enemy heroes, go and push for the win!
Good Allies
OmniKnight
Repel = Free 20 sec of unstoppable OWNAGE. They won't be able to touch you, at ALL.
Reliable Stunners
Stun, whack whack, purge, whack whack, repeat + Chain Lightning = death.
Bad Enemies Enemy
AntiMage
No mana shield = easy kill.
Replays
here
Conclusion
Following comments of my other guide, I tried to make this one as short and concise as possible. So I did minimal text explaining only the basics of what to do and not much else. The main point of this guide is to show the strength of Medusa in recent versions 6.50+. Have fun owning up pubs with Medusa, and possibly competitively!
Credits: [ Zhen ] -
tnx guys new guides coming soon!
-
Foreword
Venomancer is one of the oldest heroes in DotA (unchanged name and model). I remember seeing Venom in a very early version called Defense of the Ancients TFT, that was like six years ago, his attack animation was simply ridiculous and he had that stupid Carrion Swarm spell. Things changed and with the recent remakes, IceFrog unleashed a new wave of terror and death..
Venom's background story
For those obsessed with death, poison is a necessary study. However, Lesale went a step too far. He experimented upon himself with various toxins and chemicals so that he could learn the secrets of death. These twisted his mind and mutated his body into a hideous creature which embodies an immense hatred for all things pure. He can strike an enemy with a concentrated shot of poison or even spread a toxic gas throughout an entire area, severely weakening beast and human alike.
Information
Lesale is a great ganker early/midgame due to his powerful damage over time ultimate that is extremely hazardous in team clashes. Normally used as support and ward hoe, even though he has a potential to be a great DPS hero, which I intend to introduce you to. He is also sometimes played as a roamer, which means that instead of taking a lane, he roams the map ganking enemies from Level 1. So basically it's up to you and your teammates to decide what role are you going to take.
Venom uses special, muscle-like organs in its chest cavity to hydraulically propel the needle spines to incredible rates of speed ninja.gif . Deathbringer has incredible accuracy when firing a round of its needles.
General Information
• Tavern - Midnight Tavern (V)
• Affiliation - Scourge
• Base Damage - 46 - 48
• Base Armor - 3.1 (dmg reduction 15%)
• Primary Attribute - Agility
• Strength - 18 + 1.85
• Agility - 22 + 2.6
• Intelligence - 15 + 1.75
• Movespeed - 290
• Attack speed - 1.39 sec (+22% IAS)
• Attack Range - 450 (ranged)
• Acquisition Range - 800
• Missile Speed - 900
• Attack Animation - 0.3 / 0.7
• Casting Animation - 0.51
• Sight Range - 800
Pros&Cons
Great ganker
Not item dependent early game
Powerful ulty
Great dps potential
No natural escape meka
Fragile
Mana problems early game
Skills
Indepth view of the skill
[*] Venomous Gale works by using Dummy units to cast Shadow Strike on all enemy units inside the AoE of the skill. Because of this, the skill can be considered a Shadow Strike spell for most purposes, thus this skill is blocked by Linken's Sphere.
[*] Venomous Gale has a 3 second damage interval: every 3 seconds after the spell strikes the target, the unit will take the stated duration damage, for a total of 5 times in 15 seconds. The total spell damage for Venomous Gale is therefore 100/170/270/350.
[*] Venomous Gale slows Movement Speed by 50% initially at all levels, with the slow changing as a cubic function to be 0 at the end of the 15.1 second duration. See the Shadow Strike Slow % Graph for a visual representation. Note that the slow changes in intervals of 1 second, but a curve is drawn to demonstrate the cubic nature of the slow.
[*] The slow is not removed by Purge.
[*] Venomous Gale deals Magical damage which is reduced by the target's Spell Resistance and is blocked by Spell Immunity.
Poison Sting
Indepth view of the skill
[*] Buff placers do not stack.
[*] Poison Sting can kill units as of version 6.58.
[*] Poison Sting deals Magical damage which is reduced by the target's Spell Resistance and goes through Spell Immunity.
Plague Ward
Indepth view of the skill
[*] They have 600 attack range and attacks every 1.5 seconds.
[*] Plague Wards deals Piercing damage.
[*] Plague Wards has Spell Immunity and Marker. Marker skill makes this unit immune to most triggered abilities such as Faceless Void's Chronosphere.
Poison Nova
Indepth view of the skill
[*] Poison Nova has a movement speed of 500.
[*] Poison Nova will have absolutely no effect on units damaged by Shukuchi (Weaver), if both spells are cast within 4 seconds (the duration of Shukuchi) of each other. Since the damage is based from the same skill (Phoenix Fire).
[*] Poison Nova cannot kill units, and will only bring them to 1 HP. For maximum effectiveness, Poison Nova should be partnered with another Damage Over Time skill that can kill units.
[*] Poison Nova deals Magical damage which is reduced by the target's Spell Resistance and is blocked by Spell Immunity.
Builds
[*]Skillbuilds
[*]Itembuilds
I present to you - the DPS Build. In order to properly obtain this item build you need to solo mid. Purchasing the bottle as your first item solves two of your early game issues, low mana and hp. After the bottle you need to focus on boosting the movespeed, attack speed, and dps.
Do some decent last hitting, (fb) and gank top/bottom. Now you have to go/tp back to base. Buy Boots of Speed and a bracer. Don't forget town portals. I spam tp scrolls until full inventory.
Yasha next, followed by Phase Boots. The next item I find to be extremely effective mid/late game. Helm of teh Dominator. Orb effect, stacks with stings so np. To gain full advantage of the HotD you need damage, lots of dmg and attack speed..
The best item in this build. Bfly is your bread and butter. It gives Deathbringer the edge. Only a few can evade this combination of attack speed, phase boots and decent damage.Assuming that this is a decent game and it's already late mid game, you need to focus on the dmg output. If you're feeling godlike you can risk with Divine Venom, but if you're desperate for +1 just go MKB. I've also added hyper stone for games that end before 40min mark and you need to bring devastation on the entire enemy base.
This build is dedicated to roaming early game, initiating ganks mid to late game and spamming Poison Nova late game. You can also support your team by placing obs/sentry wards all over the map. Dagger is the accent of this build. While Aghanim's enables you to literally spam Poison Nova every minute, devastating creep waves and heroes. Bloodstone is not a bad option too..
In different scenarios items like
could save you a lot of unnecessary emotions. It's all up to you..Get
in case you're facing heroes like Crix, Axe, Lion, Lina, PL, Bounty, etc.Gameplay
[*]Lasthitting/Denying/Strafe
The attack animation of the Venomancer is perfect for lasthitting/denying since lvl1. Remember that Poison Sting does DOT, so it's basically impossible to miss creep kills/denies.
Strafe or "sidestepping" is an integral part of my play style as it allows me to dodge incoming vector spells while keeping my view aimed at the target. In order to be effective, strafe movement should not follow any pattern (or else you can end up stunned by e.g. Elune's Arrow, Hookshot, etc).
Killing
It's actually pretty easy to kill one enemy, the tricky part while ganking with Venom is when you have two targets. Most of the cases just try to strike the two enemy heroes with Venomous Gale and then Nova, but sometimes you have to chose between the two targets. Or you could first use Nova on both of them, Gale the weaker hero and continue orb walking the other. Just go with teh flow..
Late-mid game it's all about team clashes, so either you're the dps machine flanking and killing the entire team or you're the blink-in kamikaze who's trying to poison as many as possible.
[*]Using Gale
Targeting units with Venomous Gale is not much of an issue. All you have to do is make sure that the target is straight ahead and in range of 800 units then release. Upon impact it poisons the enemy unit. Poisoned units take initial damage, damage over time, and have their movement speed slowed for a short duration.
As you may noticed, Venomous Gale has plenty of AoE. You can also use Gale to finish off enemies..
The slow effect of the Venomous Gale is what makes it a great spell and primary ganking tool. Venomous Gale slows Movement Speed by 50% initially at all levels, with the slow changing as a cubic function to be 0 at the end of the 15.1 second duration. Here's a table that illustrates well what I've just said:
[*]Using Wards
Wards are mostly used for pushing/defending and farming/Roshan. You could get a ward kill but that's very situational. So go ahead, spam Plague Wards while pushing/defending. Place them in or out of tower range depending on what you intend to do (to deflect the tower fire, or to create a hazardous area that no enemy wants to enter).
[*]Using Nova
This is what makes Venom so useful in team fights/ganks. Although Poison Nova cannot kill units, and will only bring them to 1 HP, it has the power to completely shut down the entire enemy team or at least a great part of it. Also Venom's ultimate skill is very efficient against pushing creep waves. For maximum effectiveness, Poison Nova should be paired with another Damage Over Time skill. You should be very careful when creating the blast and must keep in mind that Poison Nova has movement speed of 500 and an AoE of 950 units.
The ultimate combo includes Dagger and Lothar's. You just blink-in, blast and wind walk away.
[*]Soloing Roshan
Venomancer can solo Roshan very fast at lvl14. Plague Wards help you destroy Roshan as they tank all the damage. Just spam every 5 seconds. Also while roshaning use a couple of wards as observers.
As you may noticed,
* Hero - 5lvl
* Skills:
o Plague Ward - 3lvl
o Poison Sting - 2lvl
* Items needed - 2x Circlets, 1x Clarity Potion and 2x GG
Every ward lasts 40 seconds and has 5 sec cd and you just keep spamming untill it dies.. You can do it for under 4 minutes from base w/ no boots.
Hero Synergies
[*]Best friends
[*]Worst Enemies
Credits : killing machine <3 -
bb wraith
its sounds like wrath :p
xaxa no are one item from dota look my avatar
-
adena can sent only donator or vip?
-
GN nightcheaters cya !
-
hmm let's see!
Chucky the doll?
-
you jumped into the cream of the l2 maniacs so watch out :D hello by the way :D
i play and lineage :P but im dota lover :D
w0000000t
new member
you gonna join our spam :D ?
i hope to spam with mxc members ;D
-
hello night cheaters ;) im new here im dota player and i join here to see some dota tricks ;) i hope to stay here look nice !
-
no is not too useful 8 Heart of Tarrasque wtf?


 i love this hero!


 The best item in this build. Bfly is your bread and butter. It gives Deathbringer the edge. Only a few can evade this combination of attack speed, phase boots and decent damage.
 could save you a lot of unnecessary emotions. It's all up to you..
 in case you're facing heroes like Crix, Axe, Lion, Lina, PL, Bounty, etc.


Help with images
in Spam Topics
Posted
you are here .. Hit Me ;)